Difference between revisions of "Spatial Manager™ for BricsCAD - FAQs: Import"
m |
m |
||
| (52 intermediate revisions by 2 users not shown) | |||
| Line 1: | Line 1: | ||
| + | [[image:SPM BricsCAD Wiki to Website.png|150px|link=https://www.spatialmanager.com/spm-forbricscad/ |Spatial Manager™ for BricsCAD product page]] [[image:SPM BricsCAD Wiki to Download.png|150px|link=https://www.spatialmanager.com/download/spatial-manager-bricscad/ |Download Spatial Manager™ for BricsCAD]] | ||
| + | |||
| + | |||
| + | |||
| + | ''Notes:'' | ||
| + | *''Some components in the images on this page (providers, names, windows look, etc.) may be slightly different from those that will appear on your computer'' | ||
| + | *''Some application functions need to access the Internet from the application itself. If you experiment problems in any process, ask your network administrator if there is a Proxy server installed on your network. You can configure the [[Spatial_Manager%E2%84%A2_for_BricsCAD_-_FAQs:_Interface#Options|Proxy settings through the application options]]'' | ||
| + | *''Some geographic data providers (Geocode, image Maps, etc.) may need a user account, which you can configure in the [[Spatial_Manager%E2%84%A2_for_BricsCAD_-_FAQs:_Interface#Options|Service Provider API Keys settings through the application options]]'' | ||
| + | |||
| + | |||
| + | |||
===Introduction=== | ===Introduction=== | ||
*'''Objective of this section''' | *'''Objective of this section''' | ||
| Line 19: | Line 30: | ||
| − | [[Image:Files-5AC.png|border|Import a file or a table into BricsCAD using the contextual menu]] | + | <span title="Import a file or a table into BricsCAD using the contextual menu">[[Image:Files-5AC.png|border|Import a file or a table into BricsCAD using the contextual menu|link=]]</span> |
| Line 25: | Line 36: | ||
| − | [[Image:WizImport45.png|border|Import Parameters window]] | + | <span title="Import Parameters window">[[Image:WizImport45.png|border|Import Parameters window|link=]]</span> |
| Line 34: | Line 45: | ||
****''A Block Name'' in the drawing or | ****''A Block Name'' in the drawing or | ||
****''Choose the option "Use Field values for Name...",'' allowing you to select the Block definition to use for the point Features or Centroids depending on the value of a Field in the data table. If this value do not match any Name among the Block Names in the drawing, the application will use BricsCAD Points to import the corresponding point Features or Centroids. If you choose this option, the "Block options" window (see next paragraph) will be automatically opened allowing you to select the Field for the Block Names | ****''Choose the option "Use Field values for Name...",'' allowing you to select the Block definition to use for the point Features or Centroids depending on the value of a Field in the data table. If this value do not match any Name among the Block Names in the drawing, the application will use BricsCAD Points to import the corresponding point Features or Centroids. If you choose this option, the "Block options" window (see next paragraph) will be automatically opened allowing you to select the Field for the Block Names | ||
| − | ***''Block options''. Here you can choose the Field for the Block Names (see the previous paragraph), the correspondence between Fields (if any in the data source) and Block Attributes (if any in the Block definition), and the Block Insertion parameters, such as the Rotation and the Scales, from values of Fields in the data source. This item will be disabled if there are no Attributes in the Block definition and there are no numeric Fields in the data source | + | ***''Block options''. Here you can choose the Field for the Block Names (see the previous paragraph), the correspondence between Fields (if any in the data source) and Block Attributes (if any in the Block definition), the option to use or not LUPREC for decimal places ''(see Notes below)'' and the Block Insertion parameters, such as the Rotation and the Scales, from values of Fields in the data source. This item will be disabled if there are no Attributes in the Block definition and there are no numeric Fields in the data source |
| − | ****'' | + | ****''Notes:'' |
| − | *'''Lines and Borders options'''. Here you can define the options for | + | *****''When Inserting, the Rotation of the Block References will consider the positive angles direction defined according to the value of the System Variable ANGDIR (Please, take a look to ANGDIR and UNITS in the BricsCAD Help)'' |
| + | *****''You can choose that the value of the LUPREC variable (Length precision) be used or not for the number of decimal places when writing Attributes to a numerical field (Please, take a look to LUPREC and UNITS in the BricsCAD Help). This option also affects the numeric field Labels and can also be changed there (See Label options below)'' | ||
| + | *'''Lines and Borders options'''. Here you can define the options for linear type Features and for borders of Polygons (if you choose any option to draw borders in the Polygons options). This area will be disabled if the application "knows" there are no lines or borders to draw | ||
**''Import as BricsCAD Polylines, Polylines 2D or Polylines 3D'' | **''Import as BricsCAD Polylines, Polylines 2D or Polylines 3D'' | ||
**''Insert Nodes'' (of Polylines) as BricsCAD Points | **''Insert Nodes'' (of Polylines) as BricsCAD Points | ||
*'''Polygons options'''. Here you can define the options for polygonal type Features. This area will be disabled if the application "knows" there are no polygons to draw | *'''Polygons options'''. Here you can define the options for polygonal type Features. This area will be disabled if the application "knows" there are no polygons to draw | ||
| − | **''Import | + | **''Import Borders, Borders and Centroids, Centroids only, Polygons or Polygons and Centroids'' |
| + | ***There are two interesting options here (Polygons and Polygons and Centroids) which allow you to select MPolygons as the type of object to use ''(BricsCAD 20 and upper)''. The MPolygons can be defined by multiple rings, even including holes, as a single BricsCAD entity | ||
**''Fill areas using Hatches''. This item will be disabled if you have chosen the option to import as "Only Centroids" | **''Fill areas using Hatches''. This item will be disabled if you have chosen the option to import as "Only Centroids" | ||
| − | ***''Hatch options''. Here you can define the options for the Hatches such as Pattern, Angle and Scale (except for "Solid" pattern), Apply Transparency to the Hatch (whenever BricsCAD supports the Transparency property) and if the Hatch is Associative or not. Some of these parameters can be taken from Fields in the data source | + | ***''Hatch options''. Here you can define the options for the Hatches such as Pattern, Angle and Scale (except for "Solid" pattern), Apply Transparency to the Hatch (whenever the installed BricsCAD version supports the Transparency property) and if the Hatch is Associative or not. Some of these parameters can be taken from Fields in the data source |
*'''Label options''' | *'''Label options''' | ||
**''Label entities using field value''. You can select any Field to create Text entities in BricsCAD in order to label the incoming entities by reading the text strings from this Field. Each Text entity will go to the same layer of the labeled entity. The Polygon labels will be placed at the Polygon Centroid position and the Polylines will be labeled according to a scheme that considers the lengths of the different segments ("smart" labeling") | **''Label entities using field value''. You can select any Field to create Text entities in BricsCAD in order to label the incoming entities by reading the text strings from this Field. Each Text entity will go to the same layer of the labeled entity. The Polygon labels will be placed at the Polygon Centroid position and the Polylines will be labeled according to a scheme that considers the lengths of the different segments ("smart" labeling") | ||
| − | ***''Label options''. You can define the Style, Height, Justification, Rotation and Rotation Units of the Text entities here. Some of these parameters can be taken from Fields in the data source. As | + | ***''Label options''. You can define the Style, Height, Justification, Rotation and Rotation Units of the Text entities here. Some of these parameters can be taken from Fields in the data source. For linear entities you can also specify the separation in drawing units between labels to be repeated along the entity, or if you want a single label for each entity. As added parameters, you can set the option to use or not LUPREC for decimal places ''(see Notes below)'' and configure if you want to insert the imported geometry and its label or the label only. Be careful: if you check this box you will only get the Labels (Text entities) but not the imported entities. This option may be interesting to Label drawings which already have graphic information or Background maps. If the option ''Mask labels'' is checked, masks will be generated (Wipeout entities, grouped with the Labels) and they will "trim" the entities located behind the Labels in order to improve its reading |
***''Notes:'' | ***''Notes:'' | ||
****''When Labeling, the Rotation of the Texts will consider the positive angles direction defined according to the value of the System Variable ANGDIR (Please, take a look to ANGDIR and SETTINGS -> "Angular Units" in the BricsCAD Help)'' | ****''When Labeling, the Rotation of the Texts will consider the positive angles direction defined according to the value of the System Variable ANGDIR (Please, take a look to ANGDIR and SETTINGS -> "Angular Units" in the BricsCAD Help)'' | ||
| + | ****''You can choose that the value of the LUPREC variable (Length precision) be used or not for the number of decimal places when labeling entities using a numerical field (Please, take a look to LUPREC and UNITS in the BricsCAD Help). This option also affects the Attributes to numerical fields options writing process and can also be changed there (See Block options above)'' | ||
****''Entity data (EED/XDATA) are not attached to the Labels, even when the option "Import Features data as entities Extended Entity Data (EED)" is checked (see below)'' | ****''Entity data (EED/XDATA) are not attached to the Labels, even when the option "Import Features data as entities Extended Entity Data (EED)" is checked (see below)'' | ||
| + | ****''Label Masks may have some functional issues or may not be available in versions earlier than BricsCAD 18'' | ||
| + | ****''In addition to the labeling functionality when importing entities, the [[Spatial_Manager%E2%84%A2_for_BricsCAD_-_FAQs:_Data_Structure_Management_(%22Standard%22_and_%22Professional%22_editions_only)#How_to_label_the_entities_data_in_the_drawing.3F|'SPMLABEL']] command is also available, which allows you to label data for imported or user-created entities'' | ||
*'''General options''' | *'''General options''' | ||
**''Layer/Table name''. This setting defines the target Layer name for the imported entities. You can select an existing Layer in the drawing or you can write the name to create a new Layer (the application will propose a suitable name that will depend on the data source) | **''Layer/Table name''. This setting defines the target Layer name for the imported entities. You can select an existing Layer in the drawing or you can write the name to create a new Layer (the application will propose a suitable name that will depend on the data source) | ||
| Line 70: | Line 87: | ||
| − | [[Image:PropEEDACAD2.png|border|Entity data and "http" case]] | + | <span title="Entity data and 'http' case">[[Image:PropEEDACAD2.png|border|Entity data and "http" case|link=]]</span> |
| Line 83: | Line 100: | ||
If the application "knows", "guesses" or "can assume" the CRS of the source and/or the target (drawing) data, it will be chosen by default. You will be able to modify this choice except in cases where only one CRS is valid; for example, for a KML or a KMZ file the only valid choice is the CRS "WGS84 (SRID 4326)", because these types of file are always defined using this CRS | If the application "knows", "guesses" or "can assume" the CRS of the source and/or the target (drawing) data, it will be chosen by default. You will be able to modify this choice except in cases where only one CRS is valid; for example, for a KML or a KMZ file the only valid choice is the CRS "WGS84 (SRID 4326)", because these types of file are always defined using this CRS | ||
| − | You can assign a CRS to the drawing, or modify it, using the command 'SPMSETCRS'. By executing this command you will access the CRS Catalog of the application, described in the previous lines. In this case the Type "Projected" will be selected by default because is the most common choice | + | You can assign a CRS to the drawing, or modify it, using the command 'SPMSETCRS'. By executing this command, you will access the CRS Catalog of the application, described in the previous lines. In this case the Type "Projected" will be selected by default because is the most common choice |
*When importing a table defined using a known CRS into a drawing without an assigned CRS, the CRS of the table is automatically assigned to the drawing | *When importing a table defined using a known CRS into a drawing without an assigned CRS, the CRS of the table is automatically assigned to the drawing | ||
*If you change the target CRS by choosing any CRS other than the drawing CRS, you will get a warning from the application but you can continue and perform the Transformation of coordinates if you want to | *If you change the target CRS by choosing any CRS other than the drawing CRS, you will get a warning from the application but you can continue and perform the Transformation of coordinates if you want to | ||
| Line 96: | Line 113: | ||
| − | [[Image:TC-14.png|border|Access to the CRS Catalog of the application]] | + | <span title="Access to the CRS Catalog of the application">[[Image:TC-14.png|border|Access to the CRS Catalog of the application|link=]]</span> |
| + | |||
| + | |||
| + | <span title="CRS Catalog of the application">[[Image:TC-3.PNG|border|CRS Catalog of the application|link=]]</span> | ||
| + | |||
| + | |||
| + | <span title="'SPMSETCRS' command in the Spatial Manager™ for BricsCAD Ribbon (Can also be found in the drop-down Menu and Toolbar of Spatial Manager)">[[Image:SPMSetCrBCAD25-2.png|border|'SPMSETCRS' command in the Spatial Manager™ for BricsCAD Ribbon (Can also be found in the drop-down Menu and Toolbar of Spatial Manager)|link=]]</span> | ||
| + | |||
| + | <span title="Last used CRSs in the Catalog window">[[Image:SPMSetCrsLast.png|border|Last used CRSs in the Catalog window|link=]]</span> | ||
| − | |||
| + | *''Notes about transformation Grid files:'' | ||
| + | **''Some coordinate transformations (NTv2, etc.) require one or more Grid files in order to be processed. Some of the most commonly used Grid files worldwide are included in the application, but you can see that some others instruct you on where to download Grid file(s) not included with the application (usually a download URL)'' | ||
| + | **''On the other hand, even if the required Grid file(s) already exists (included as standard in the application, or previously downloaded by the user), the application allows the user to choose an alternative Grid file(s) so that he can use more accurate or updated Grid transformations when more appropriated files are available. This custom choice for a Grid file is kept by default for a work session, but will not be memorized when exiting and re-entering the application'' | ||
| − | |||
| + | <span title="Selecting alternative Grid files">[[image:SPMSelGridCRSFile.png|border|link=]]</span> | ||
| − | |||
| Line 112: | Line 138: | ||
| − | [[Image:SkipFields.png|border|Skip fields window]] | + | <span title="Skip fields window">[[Image:SkipFields.png|border|Skip fields window|link=]]</span> |
| Line 120: | Line 146: | ||
| − | [[Image:Finish_button.png|border|Finish (skip steps) button]] | + | <span title="Finish (skip steps) button">[[Image:Finish_button.png|border|Finish (skip steps) button|link=]]</span> |
| Line 130: | Line 156: | ||
| − | [[Image:EED-1.png|border|Entities data in the application palette]] | + | <span title="Entities data in the application palette">[[Image:EED-1.png|border|Entities data in the application palette|link=]]</span> |
| Line 138: | Line 164: | ||
| − | [[Image:EED-2.png|border|"Various" case in the entity data display]] | + | <span title="'Various' case in the entity data displa">[[Image:EED-2.png|border|"Various" case in the entity data display|link=]]</span> |
| + | |||
| + | |||
| + | Alternatively, you can use the Spatial Manager™ for BricsCAD 'Data Grid' palette ("Professional" edition only) in order to view, edit, select, export, etc. the entities data in a table form | ||
| + | |||
| + | |||
| + | <span title="'Data Grid' palette">[[Image:SPMDataTableGridCAD-A.png|border|'Data Grid' palette|link=]]</span> | ||
| + | |||
| + | |||
| + | Learn more about the [[Spatial Manager™ for BricsCAD - FAQs: Data Structure Management ("Standard" and "Professional" editions only)#Can I view and edit the entities data in a table form? ("Professional" edition only)|'Data Grid']] and all its features and functions | ||
| Line 148: | Line 183: | ||
| − | [[Image:EED-3.PNG|border|Direct data edit in the Properties area]] | + | <span title="Direct data edit in the Properties area">[[Image:EED-3.PNG|border|Direct data edit in the Properties area|link=]]</span> |
| + | |||
| + | |||
| + | As you can read in the previous article, you can use the Spatial Manager™ for BricsCAD 'Data Grid' palette ("Professional" edition only) in order to view, edit, select, export, etc. the entities data in a table form | ||
| + | |||
| + | Learn more about the [[Spatial Manager™ for BricsCAD - FAQs: Data Structure Management ("Standard" and "Professional" editions only)#Can I view and edit the entities data in a table form? ("Professional" edition only)|'Data Grid']] and all its features and functions | ||
===Can I modify the entities data structure? ("Standard" and "Professional" editions only)=== | ===Can I modify the entities data structure? ("Standard" and "Professional" editions only)=== | ||
| − | Yes, you can Add, Modify or Delete fields in | + | Yes, you can Add, Modify or Delete fields in a table structure as well as Create, Restore, Edit, Rename and Delete data tables. Learn more about the [[Spatial Manager™ for BricsCAD - FAQs: Data Structure Management ("Standard" and "Professional" editions only)|"Data Structure Management"]] |
| − | [[Image: | + | <span title="Table definition window">[[Image:SPMDefineTableWinACAD4.PNG|border|Table definition window|link=]]</span> |
| Line 164: | Line 204: | ||
| − | [[Image:SPMIMPORT_BCAD38.png|border|Import directly window]] | + | <span title="Import directly window">[[Image:SPMIMPORT_BCAD38.png|border|Import directly window|link=]]</span> |
| + | |||
| + | |||
| + | Although the application main palette [[Spatial_Manager™_for_BricsCAD_-_FAQs:_Data_sources | (see Data sources)]] is the primary tool to manage resources and accesses, create/edit [[Spatial_Manager™_for_BricsCAD_-_FAQs:_Data_sources#What_are_the_Shortcuts.3F | Shortcuts]] and [[Spatial_Manager™_for_BricsCAD_-_FAQs:_Data_sources#What_are_the_User_Data_Sources_.28UDSs.29.3F_.28.22Standard.22_and_.22Professional.22_editions_only.29 | User Data Sources (UDS)]], and other related functions, the context menus (righ-click) in this direct Import window, will also allow you to execute many of these functions "on the fly", without having to return to the main palette | ||
| + | |||
| + | |||
| + | <span title="Contextual options in the Import window">[[Image:SPMImportRC.png|border|Contextual options in the Import window|link=]]</span> | ||
| Line 172: | Line 218: | ||
| − | [[Image:SPM_ImportAll2.png|border|Contextual function to Import in one go the content of all the files from a folder]] | + | <span title="Contextual function to Import in one go the content of all the files from a folder">[[Image:SPM_ImportAll2.png|border|Contextual function to Import in one go the content of all the files from a folder|link=]]</span> |
| Line 179: | Line 225: | ||
**You may want to mark this option for example when the information contained in each file or table is not homogenous | **You may want to mark this option for example when the information contained in each file or table is not homogenous | ||
**You may want to unmark this option for example when you are importing the same class of objects split in a grid | **You may want to unmark this option for example when you are importing the same class of objects split in a grid | ||
| − | **When the "Table" option is selected, the name of the Layers will be formed by the File name and the corresponding Table name | + | **When the "Table" option is selected and there are several files to import, the name of the Layers will be formed by the File name and the corresponding Table name |
*Fill areas using Hatches | *Fill areas using Hatches | ||
**This option will be applied to all the Polygonal entities imported from any file | **This option will be applied to all the Polygonal entities imported from any file | ||
| Line 193: | Line 239: | ||
| − | [[Image:SPM_ImportAllOptions2.png|border|"Import all" basic options window]] | + | <span title="'Import all' basic options window">[[Image:SPM_ImportAllOptions2.png|border|"Import all" basic options window|link=]]</span> |
''Note: When using this function, if the drawing is unreferenced the most suitable CRS will be automatically assigned to the drawing'' | ''Note: When using this function, if the drawing is unreferenced the most suitable CRS will be automatically assigned to the drawing'' | ||
| + | |||
| + | |||
| + | |||
| + | ===Is there any way to import in one go the content of all schemas in a User Data Source (UDS) or all tables in a schema or file (advanced batch import)=== | ||
| + | Yes, Spatial Manager™ for BricsCAD provides a functionality similar to that of the previous section when it comes to batch importing all schemas from a data source or all tables in a schema or file | ||
| + | |||
| + | |||
| + | <span title="'Import all' schemas or tables in a schema">[[Image:SPM_ImportAllSchTab.png|border|"Import all" schemas or tables in a schema|link=]]</span> | ||
| Line 206: | Line 260: | ||
| − | [[Image:ACADTask_1.png|border|"Task manager" area in the application palette]] | + | <span title="'Task manager' area in the application palette">[[Image:ACADTask_1.png|border|"Task manager" area in the application palette|link=]]</span> |
| Line 218: | Line 272: | ||
| − | [[Image:ACADTask_2.png|border|Creata a new Task]] | + | <span title="Creata a new Task">[[Image:ACADTask_2.png|border|Creata a new Task|link=]]</span> |
| Line 228: | Line 282: | ||
| − | [[Image:ExecuteTasksACAD.png|border|Execute one or more Tasks]] | + | <span title="Execute one or more Tasks">[[Image:ExecuteTasksACAD.png|border|Execute one or more Tasks|link=]]</span> |
| Line 234: | Line 288: | ||
| − | [[Image:ExecuteTasksACAD2.png|border|Cancel a Task]] | + | <span title="Cancel a Task">[[Image:ExecuteTasksACAD2.png|border|Cancel a Task|link=]]</span> |
| Line 242: | Line 296: | ||
| − | [[Image:ACADTask_Properties.png|border|Properties of a Task]] | + | <span title="Properties of a Task">[[Image:ACADTask_Properties.png|border|Properties of a Task|link=]]</span> |
| Line 252: | Line 306: | ||
| − | [[Image:ACADSort_Tasks.png|border|Sort Tasks button]] | + | <span title="Sort Tasks button">[[Image:ACADSort_Tasks.png|border|Sort Tasks button|link=]]</span> |
| Line 260: | Line 314: | ||
| − | [[Image:ACADRename_Delete_Tasks.png|border|Delete or rename a Task]] | + | <span title="Delete or rename a Task">[[Image:ACADRename_Delete_Tasks.png|border|Delete or rename a Task|link=]]</span> |
| − | [[Image:ACADRefresh_Tasks.png|border|Button for Refresh the Task list]] | + | <span title="Button for Refresh the Task list">[[Image:ACADRefresh_Tasks.png|border|Button for Refresh the Task list|link=]]</span> |
| Line 275: | Line 329: | ||
| − | [[Image:SPMIMPORT_Cmd_Line2.png|Sample script using '-SPMIMPORT']] | + | <span title="Sample script using '-SPMIMPORT'">[[Image:SPMIMPORT_Cmd_Line2.png|Sample script using '-SPMIMPORT'|link=]]</span> |
| Line 282: | Line 336: | ||
*[[Spatial Manager™ for BricsCAD - FAQs: Providers|See "Providers" also]] | *[[Spatial Manager™ for BricsCAD - FAQs: Providers|See "Providers" also]] | ||
*Blog posts | *Blog posts | ||
| − | **[ | + | **[https://www.spatialmanager.com/point-coordinates-also-as-data-fields-2/ Point coordinates also as data fields] |
| − | **[ | + | **[https://www.spatialmanager.com/choose-3d-or-2d-when-importing/ Choose 3D or 2D when importing] |
| − | **[ | + | **[https://www.spatialmanager.com/may15-new-releases-the-powerful-tasks-technology/ The powerful “Tasks” come in] |
| − | **[ | + | **[https://www.spatialmanager.com/speed-up-when-importing-heavy-sources/ Speed up when importing heavy sources] |
| − | **[ | + | **[https://www.spatialmanager.com/quick-thematics-in-autocad-or-bricscad/ Quick Thematics in BricsCAD] |
| − | **[ | + | **[https://www.spatialmanager.com/hyperlinks-in-data-fields/ Hyperlinks in Data fields] |
| − | **[ | + | **[https://www.spatialmanager.com/new-release-3-2-the-blocks-version/ New release 3.2. 'Blocks' enhancements] |
| − | **[ | + | **[https://www.spatialmanager.com/labeling-objects-importing/ Labeling objects while importing] |
| − | **[ | + | **[https://www.spatialmanager.com/labeling-polylines-smart-labels/ Labeling Polylines too. ‘Smart’ labels and …] |
| − | **[ | + | **[https://www.spatialmanager.com/support-for-ordnance-survey-schema-9-products/ Support for Ordnance Survey – Schema 9 products] |
| − | **[ | + | **[https://www.spatialmanager.com/graphic_filter_while_importing_in_cad/ Graphic Filter while Importing in CAD] |
| − | **[ | + | **[https://www.spatialmanager.com/little-known-options-when-importing-from-openstreetmap/ Little-known options when importing from OpenStreetMap] |
| − | **[ | + | **[https://www.spatialmanager.com/improving_performance_when_importing_from_openstreetmap/ Improve performance when importing from OpenStreetMap] |
| − | **[ | + | **[https://www.spatialmanager.com/enhanced_ascii_data_provider_v4/ Enhanced ASCII data provider (CSV, TXT, ASC, XYZ, …)] |
| − | **[ | + | **[https://www.spatialmanager.com/command-line_importing_scripts/ Command-line Importing. Scripts] |
| − | **[ | + | **[https://www.spatialmanager.com/from_excel_to_cad_drawings_quick_and_easy/ From Excel to CAD drawings: quick and easy] |
| − | **[ | + | **[https://www.spatialmanager.com/small-automated-things-that-make-your-life-easier/ Small automated things that make your life easier] |
| − | **[ | + | **[https://www.spatialmanager.com/the-powerful-import-all-tool/ The powerful ‘Import-all’ tool] |
| − | **[ | + | **[https://www.spatialmanager.com/import-all-function-enhancements/ ‘Import-all’ function Enhancements] |
| − | **[ | + | **[https://www.spatialmanager.com/export-and-import-the-hatches-properties/ Import Hatches properties] |
| − | **[ | + | **[https://www.spatialmanager.com/coordinate-systems-and-transformations-detailed-info/ Coordinate Systems and Transformations detailed info] |
| − | **[ | + | **[https://www.spatialmanager.com/importing-geo-referenced-raster-images/ Importing geo-referenced Raster Images] |
| − | **[ | + | **[https://www.spatialmanager.com/importing-lidar-data/ Importing LiDAR data] |
| − | **[ | + | **[https://www.spatialmanager.com/creating-thematic-maps-while-importing/ Creating thematic maps while importing] |
| − | **[ | + | **[https://www.spatialmanager.com/tricks-to-optimize-labeling-while-importing/ Tricks to optimize labeling while importing] |
| − | **[ | + | **[https://www.spatialmanager.com/import_as_2d_or_3d_objects/ Import as 2D or 3D objects] |
| − | **[ | + | **[https://www.spatialmanager.com/import_from_palette_vs_using_spmimport/ Import from Palette vs using SPMIMPORT] |
| + | **[https://www.spatialmanager.com/managing-multi-polygons-in-autocad-bricscad-zwcad/ Managing Multi-Polygons in BricsCAD] | ||
| + | **[https://www.spatialmanager.com/adding-openstreetmap-or-google-maps-objects-to-your-maps/ Adding OpenStreetMap or Google Maps objects to your maps] | ||
| + | **[https://www.spatialmanager.com/now-also-import-all-tables-from-udss-or-files/ Now also Import-All Tables from UDSs or files] | ||
| + | **[https://www.spatialmanager.com/lightning-speed-surfaces-labeling/ Lightning Speed Areas Labeling] | ||
| + | **[https://www.spatialmanager.com/batch-import-openstreetmap-sample/ Batch Import (OpenStreetMap sample)] | ||
| + | **[https://www.spatialmanager.com/labeling-objects-while-importing-new-options/ Labeling objects while importing: New options…] | ||
| + | **[https://www.spatialmanager.com/area-filter-when-importing-all/ Area filter when ‘Importing all’] | ||
| + | **[https://www.spatialmanager.com/capture-and-import-google-earth-images-geprint/ Capture and import Google Earth images (.geprint)] | ||
| + | **[https://www.spatialmanager.com/load-or-import-multiple-data-sources-at-once/ Load or import multiple data sources at once] | ||
| + | **[https://www.spatialmanager.com/thematize-by-element-type-and-attached-data/ Thematize by element type and attached data] | ||
| + | **[https://www.spatialmanager.com/contours-and-imported-objects-label-masks/ Contours and imported objects Label Masks] | ||
| + | **[https://www.spatialmanager.com/ascii-data-provider-tabular-format/ ASCII data provider Tabular format] | ||
| + | **[https://www.spatialmanager.com/labeling-data-of-objects-in-a-drawing/ Labeling data of objects in a drawing] | ||
| + | **[https://www.spatialmanager.com/spatial-filter-parameter-in-tasks/ Spatial Filter parameter in Tasks] | ||
| + | **[https://www.spatialmanager.com/import-points-as-blocks-from-disk/ Import points as Blocks from disk] | ||
| + | **[https://www.spatialmanager.com/combine-native-attributes-with-data-from-tables/ Combine native Attributes with data from tables] | ||
| + | **[https://www.spatialmanager.com/spatial-filter-envelope-in-wfs-servers/ Spatial filter envelope in WFS servers] | ||
| + | **[https://www.spatialmanager.com/extract-3d-points-from-other-objects/ Extract 3D points from other objects] | ||
| + | **[https://www.spatialmanager.com/using-custom-grid-files/ Using custom Grid files] | ||
**''Developed for other CAD applications prior to the release of Spatial Manager™ for BricsCAD but also applicable'' | **''Developed for other CAD applications prior to the release of Spatial Manager™ for BricsCAD but also applicable'' | ||
| − | ***[ | + | ***[https://www.spatialmanager.com/importing-shapefile-autocad// Importing shapefile (SHP)] |
| − | ***[ | + | ***[https://www.spatialmanager.com/importing-kml-files-autocad/ Importing KML files] |
| − | ***[ | + | ***[https://www.spatialmanager.com/import-openstreetmap-files-autocad-drawings/ Import OpenStreetMap data into drawings] |
| − | ***[ | + | ***[https://www.spatialmanager.com/google-earth-directly-autocad/ Search in Google Earth and use in CAD] |
| − | ***[ | + | ***[https://www.spatialmanager.com/extend-data-imported-ascii-file/ Extend the data to be imported from an ASCII file] |
| − | ***[ | + | ***[https://www.spatialmanager.com/import-3d-shapefiles-shp-in-autocad/ Import 3D Shapefiles (SHP)] |
| − | ***[ | + | ***[https://www.spatialmanager.com/label-z-values-in-autocad/ Label Z values] |
| − | ***[ | + | ***[https://www.spatialmanager.com/import-z-contours-from-a-shapefile-into-autocad Import Z-Contours from a Shapefile] |
*Technical pages | *Technical pages | ||
| − | **[ | + | **[https://www.spatialmanager.com/import-coordinates-from-excel-to-bricscad/ Import coordinates from Excel to BricsCAD] |
| − | **[ | + | **[https://www.spatialmanager.com/import-csv-into-bricscad/ Import CSV into BricsCAD] |
| − | **[ | + | **[https://www.spatialmanager.com/import-points-into-bricscad/ Import points into BricsCAD] |
| − | **[ | + | **[https://www.spatialmanager.com/bricscad-xyz/ BricsCAD XYZ] |
| − | **[ | + | **[https://www.spatialmanager.com/how-to-import-shapefiles-into-bricscad/ How to import shapefiles into BricsCAD] |
| − | **[ | + | **[https://www.spatialmanager.com/import-kml-to-bricscad/ Import KML to BricsCAD] |
| − | **[ | + | **[https://www.spatialmanager.com/ordnance-survey-in-bricscad/ Ordnance Survey in BricsCAD] |
*[[Spatial Manager™ for BricsCAD#FAQs|Go to FAQS]] | *[[Spatial Manager™ for BricsCAD#FAQs|Go to FAQS]] | ||
| + | |||
| + | |||
| + | |||
| + | [[image:SPM BricsCAD Wiki to Website.png|150px|link=https://www.spatialmanager.com/spm-forbricscad/ |Spatial Manager™ for BricsCAD product page]] [[image:SPM BricsCAD Wiki to Download.png|150px|link=https://www.spatialmanager.com/download/spatial-manager-bricscad/ |Download Spatial Manager™ for BricsCAD]] | ||
Latest revision as of 12:33, 16 June 2022
![]()
![]()
Notes:
- Some components in the images on this page (providers, names, windows look, etc.) may be slightly different from those that will appear on your computer
- Some application functions need to access the Internet from the application itself. If you experiment problems in any process, ask your network administrator if there is a Proxy server installed on your network. You can configure the Proxy settings through the application options
- Some geographic data providers (Geocode, image Maps, etc.) may need a user account, which you can configure in the Service Provider API Keys settings through the application options
Introduction
- Objective of this section
- To learn how to define import processes and their parameters and manage coordinate transformations
- Topics in this section
- Sources: data sources
- Import parameters: BricsCAD Entities parameters, Fills, Labels, BricsCAD properties, XDATA / Extended Entity Data (EED) ("Standard" and "Professional" editions only), etc.
- Transforming the coordinates: source and target, last used coordinate systems, searching in the coordinate systems table and transformation parameters
- Reviewing and editing entities data
- Direct importing (SPMIMPORT)
- Batch importing
- Tasks: save and replay import processes, manage tasks
- Importing from the Command Line
How can I Import spatial Features as BricsCAD Entities?
You can Import spatial Features as BricsCAD Entities into Spatial Manager™ for BricsCAD by using the context menu (mouse right-click) on any table or spatial file in the "Data sources" area of the "SpatialManager" palette. This will launch the "Import" wizard of the application. As you will see, you can import the table or the file in the current or a new drawing (see also "How to import directly into the current drawing?" below).

While running the "Import" wizard, you can select the Import parameters that match your needs:

- Points and Centroids options. Here you can define the options for point type Features and for centroids of Polygons (if you choose any option to draw centroids in the Polygons options). This area will be disabled if the application "knows" there are no points or centroids to draw
- Import as BricsCAD Points
- Import as Blocks. This item will be disabled if there are no Block definitions in the drawing
- Select a Block definition. You can select:
- A Block Name in the drawing or
- Choose the option "Use Field values for Name...", allowing you to select the Block definition to use for the point Features or Centroids depending on the value of a Field in the data table. If this value do not match any Name among the Block Names in the drawing, the application will use BricsCAD Points to import the corresponding point Features or Centroids. If you choose this option, the "Block options" window (see next paragraph) will be automatically opened allowing you to select the Field for the Block Names
- Block options. Here you can choose the Field for the Block Names (see the previous paragraph), the correspondence between Fields (if any in the data source) and Block Attributes (if any in the Block definition), the option to use or not LUPREC for decimal places (see Notes below) and the Block Insertion parameters, such as the Rotation and the Scales, from values of Fields in the data source. This item will be disabled if there are no Attributes in the Block definition and there are no numeric Fields in the data source
- Notes:
- When Inserting, the Rotation of the Block References will consider the positive angles direction defined according to the value of the System Variable ANGDIR (Please, take a look to ANGDIR and UNITS in the BricsCAD Help)
- You can choose that the value of the LUPREC variable (Length precision) be used or not for the number of decimal places when writing Attributes to a numerical field (Please, take a look to LUPREC and UNITS in the BricsCAD Help). This option also affects the numeric field Labels and can also be changed there (See Label options below)
- Notes:
- Select a Block definition. You can select:
- Lines and Borders options. Here you can define the options for linear type Features and for borders of Polygons (if you choose any option to draw borders in the Polygons options). This area will be disabled if the application "knows" there are no lines or borders to draw
- Import as BricsCAD Polylines, Polylines 2D or Polylines 3D
- Insert Nodes (of Polylines) as BricsCAD Points
- Polygons options. Here you can define the options for polygonal type Features. This area will be disabled if the application "knows" there are no polygons to draw
- Import Borders, Borders and Centroids, Centroids only, Polygons or Polygons and Centroids
- There are two interesting options here (Polygons and Polygons and Centroids) which allow you to select MPolygons as the type of object to use (BricsCAD 20 and upper). The MPolygons can be defined by multiple rings, even including holes, as a single BricsCAD entity
- Fill areas using Hatches. This item will be disabled if you have chosen the option to import as "Only Centroids"
- Hatch options. Here you can define the options for the Hatches such as Pattern, Angle and Scale (except for "Solid" pattern), Apply Transparency to the Hatch (whenever the installed BricsCAD version supports the Transparency property) and if the Hatch is Associative or not. Some of these parameters can be taken from Fields in the data source
- Import Borders, Borders and Centroids, Centroids only, Polygons or Polygons and Centroids
- Label options
- Label entities using field value. You can select any Field to create Text entities in BricsCAD in order to label the incoming entities by reading the text strings from this Field. Each Text entity will go to the same layer of the labeled entity. The Polygon labels will be placed at the Polygon Centroid position and the Polylines will be labeled according to a scheme that considers the lengths of the different segments ("smart" labeling")
- Label options. You can define the Style, Height, Justification, Rotation and Rotation Units of the Text entities here. Some of these parameters can be taken from Fields in the data source. For linear entities you can also specify the separation in drawing units between labels to be repeated along the entity, or if you want a single label for each entity. As added parameters, you can set the option to use or not LUPREC for decimal places (see Notes below) and configure if you want to insert the imported geometry and its label or the label only. Be careful: if you check this box you will only get the Labels (Text entities) but not the imported entities. This option may be interesting to Label drawings which already have graphic information or Background maps. If the option Mask labels is checked, masks will be generated (Wipeout entities, grouped with the Labels) and they will "trim" the entities located behind the Labels in order to improve its reading
- Notes:
- When Labeling, the Rotation of the Texts will consider the positive angles direction defined according to the value of the System Variable ANGDIR (Please, take a look to ANGDIR and SETTINGS -> "Angular Units" in the BricsCAD Help)
- You can choose that the value of the LUPREC variable (Length precision) be used or not for the number of decimal places when labeling entities using a numerical field (Please, take a look to LUPREC and UNITS in the BricsCAD Help). This option also affects the Attributes to numerical fields options writing process and can also be changed there (See Block options above)
- Entity data (EED/XDATA) are not attached to the Labels, even when the option "Import Features data as entities Extended Entity Data (EED)" is checked (see below)
- Label Masks may have some functional issues or may not be available in versions earlier than BricsCAD 18
- In addition to the labeling functionality when importing entities, the 'SPMLABEL' command is also available, which allows you to label data for imported or user-created entities
- Label entities using field value. You can select any Field to create Text entities in BricsCAD in order to label the incoming entities by reading the text strings from this Field. Each Text entity will go to the same layer of the labeled entity. The Polygon labels will be placed at the Polygon Centroid position and the Polylines will be labeled according to a scheme that considers the lengths of the different segments ("smart" labeling")
- General options
- Layer/Table name. This setting defines the target Layer name for the imported entities. You can select an existing Layer in the drawing or you can write the name to create a new Layer (the application will propose a suitable name that will depend on the data source)
- Note that this is also the name of the data Table that will be used if you also import the entities data, which will be done if the source includes any data attached to the geometric elements and you select the option "Import Features data as entities Extended Entity Data (EED)" (see below)
- If this setting is left blank, the target Layer will be the current Layer in the drawing. The used Table name (if any) will also be the name of the current Layer
- As you can see in the next setting, the Layer name can be variable for each entity but the Table name for the attached data will be unique for all the imported entities
- Use Field values for Layer. Here you can select any Field to define its value as the name of the Layer for the imported entities. If this value is null for any entity, or the setting is left blank, the entity will be drawn in the Layer selected in the previous setting
- Note that this setting is only for the name of the target Layer but not for the Table name, if any (read above)
- Apply random colors to new Layers
- Use Field values for Entity Elevation and/or Thickness
- Take advantage of the Elevation values and use a Field to get the Z-coordinate of Points, Polylines or Polygons. Think about 3D Points, Contours, etc., coming from 2D Geometries. Combined with the Thickness value you can define, for example, buildings raising from an elevation and with a specific height
- Import as 2D Entities (Z-coordinate of the geometry will be ignored). This option lets you "flatten" all the imported entities on the XY plane. Please note that if you have selected using the values in a field for the Elevations of the entities (see the previous paragraph), the XY plane will be placed at the corresponding entity Elevation
- Import Features data as Extended Entity Data (EED) ("Standard" and "Professional" editions only). If you choose this option, when you select Entities in the drawing, you will see the EEDs (or XDATA) in the "Properties" area of the "SpatialManager" palette
- Notes:
- The fields whose value starts with "http" are automatically converted into active links
- If the option "Insert only the labels and omit the objects" is checked (see above), this option is disabled so that an empty data table is not created
- Notes:
- Import only Features in the current view. This option lets you skip importing any entities outside the current drawing view
- Notes:
- "Outside" means that the whole bounding box of an entity is outside the view
- This option will be disabled when the importing process is performed using the palette contextual function "Import into a new drawing"
- Notes:
- Layer/Table name. This setting defines the target Layer name for the imported entities. You can select an existing Layer in the drawing or you can write the name to create a new Layer (the application will propose a suitable name that will depend on the data source)

How can I define a Transformation of coordinates?
When you are Importing Features as BricsCAD Entities using Spatial Manager™ for BricsCAD, you will see that you can choose a Transformation of coordinates from the source Features to the Entities in the drawing, in the "Import" wizard. This means that the application will calculate a geometric transformation between the source and the target data, which will depend on the chosen CRS for the source (incoming Features) and for the target (imported BricsCAD Entities) data. You can choose the appropriate CRSs by clicking on "CRS catalog...", in the CRS dropdown list for the source or for the target data. In the CRS table you can:
- Filter the CRSs by type (Geocentric, Projected, etc.)
- Choose a CRS by clicking on its row in the table
- Search CRSs by typing the search criteria in the "Search" box. You can type here as many words as you like separated by blanks. The application will find all the rows including all these words in any column of the table
After choosing a pair of valid CRS for a Transformation, you can choose the geographic Area to apply it to (the application will choose by default the most common Area for this Transformation)
If the application "knows", "guesses" or "can assume" the CRS of the source and/or the target (drawing) data, it will be chosen by default. You will be able to modify this choice except in cases where only one CRS is valid; for example, for a KML or a KMZ file the only valid choice is the CRS "WGS84 (SRID 4326)", because these types of file are always defined using this CRS
You can assign a CRS to the drawing, or modify it, using the command 'SPMSETCRS'. By executing this command, you will access the CRS Catalog of the application, described in the previous lines. In this case the Type "Projected" will be selected by default because is the most common choice
- When importing a table defined using a known CRS into a drawing without an assigned CRS, the CRS of the table is automatically assigned to the drawing
- If you change the target CRS by choosing any CRS other than the drawing CRS, you will get a warning from the application but you can continue and perform the Transformation of coordinates if you want to
- Notes:
- To unassign (undefine) the Coordinate System of the drawing, choose "Undefined CRS" (EPSG 0)
- As you will see, the CRS dropdown lists will include more and more CRSs as they have been previously chosen in other Transformation operations, so that you can choose your "last-used" CRSs directly from the dropdown list without having to access the CRS Catalog all the time. In addition, the CRS Catalog window shown when you execute 'SPMSETCRS' to assign a CRS to the drawing, or modify it, also includes a list of the "last-used" CRSs (if any) in the upper zone
- If the incoming data is defined using the CRS "WGS84 (SRID 4326)" and the drawing has not assigned any CRS, the transformation to the CRS "WGS 84 / Pseudo-Mercator (SRID 3857)" is selected by default to get a projected map instead of a flat representation of geodesic coordinates
- Coordinate Systems and Transformation details
- Coordinate Systems objects available in the current version


")

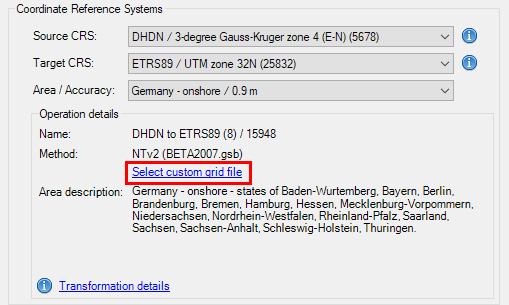
- Notes about transformation Grid files:
- Some coordinate transformations (NTv2, etc.) require one or more Grid files in order to be processed. Some of the most commonly used Grid files worldwide are included in the application, but you can see that some others instruct you on where to download Grid file(s) not included with the application (usually a download URL)
- On the other hand, even if the required Grid file(s) already exists (included as standard in the application, or previously downloaded by the user), the application allows the user to choose an alternative Grid file(s) so that he can use more accurate or updated Grid transformations when more appropriated files are available. This custom choice for a Grid file is kept by default for a work session, but will not be memorized when exiting and re-entering the application
How can I speed up the starting Import process?
Sometimes, depending on the characteristics of the source, the initial reading of the data Fields may take a long time or even block the Importing process. Spatial Manager™ for BricsCAD performs this startup reading to allow you to choose certain options relating to this data on the next wizard window, such as the use of the field values to define the target Layers for the imported Entities. However you have a button available to "Skip" this step, which does not affect the imported Entities themselves but only certain options that may not be available in the Importing process

How can I speed up the Import wizard steps?
To speed up the process when you are importing, all the "Import" wizard windows in Spatial Manager™ for BricsCAD include the "Finish" button. By pressing this button, you will directly run the Import process. The wizard will assume the default values in each step to be omitted
![]()
Can I see the data of the imported Features? ("Standard" and "Professional" editions only)
Yes, you can see the data of the imported Features in Spatial Manager™ for BricsCAD, because this data is also imported as EED (Extended Entity Data or XDATA) attached to the resulting Entities in the drawing. To see it, select an imported Entity in BricsCAD and its data will be shown in the group "Data" of the "Properties" area in the "SpatialManager" palette
In addition to the XDATA / EED, you will see some other Entity data, such as its Layer or its Bounding box, in other groups, such as "General" or "Geometry"

When selecting multiple Entities, you will see their common data here. All the data which is not equal for the selection, will be shown as "Various"
Note: Because of performance considerations, the number of entities selected for which their data are shown in the application palette is limited to 25000

Alternatively, you can use the Spatial Manager™ for BricsCAD 'Data Grid' palette ("Professional" edition only) in order to view, edit, select, export, etc. the entities data in a table form

Learn more about the 'Data Grid' and all its features and functions
Can I modify the field values of the entities data? ("Standard" and "Professional" editions only)
Yes, you can directly edit a field value (XDATA / EED Direct data edition) for one or more entities in Spatial Manager™ for BricsCAD by selecting the entity (or entities) in the drawing and typing the new value for this field in the "Properties" area of the "SpatialManager" palette. You can also delete the field content to get a null value in this field. To validate any modification, you need to press Enter or click on a different field
Note: Because of performance considerations, the number of entities selected for which their data are shown in the application palette is limited to 25000

As you can read in the previous article, you can use the Spatial Manager™ for BricsCAD 'Data Grid' palette ("Professional" edition only) in order to view, edit, select, export, etc. the entities data in a table form
Learn more about the 'Data Grid' and all its features and functions
Can I modify the entities data structure? ("Standard" and "Professional" editions only)
Yes, you can Add, Modify or Delete fields in a table structure as well as Create, Restore, Edit, Rename and Delete data tables. Learn more about the "Data Structure Management"

How to import directly into the current drawing?
In addition to importing Features from the Palette, the 'SPMIMPORT' command of Spatial Manager™ for BricsCAD allows you to import the Features directly into the current drawing without having to open the application Palette. The displayed window is similar to the Data Sources section of the Palette and once the import source is selected, the "Import" wizard includes the same steps and parameters that have been detailed in the paragraphs above

Although the application main palette (see Data sources) is the primary tool to manage resources and accesses, create/edit Shortcuts and User Data Sources (UDS), and other related functions, the context menus (righ-click) in this direct Import window, will also allow you to execute many of these functions "on the fly", without having to return to the main palette

Is there any way to import in one go the content of all the files from a folder (batch import)
Yes, Spatial Manager™ for BricsCAD provides this functionality through the contextual menu of the folders in the application palette

When executing "Import all" you can define some basic parameters:
- Create a layer for each File or Table
- You may want to mark this option for example when the information contained in each file or table is not homogenous
- You may want to unmark this option for example when you are importing the same class of objects split in a grid
- When the "Table" option is selected and there are several files to import, the name of the Layers will be formed by the File name and the corresponding Table name
- Fill areas using Hatches
- This option will be applied to all the Polygonal entities imported from any file
- Select a CRS for unreferenced sources
- Since the "Import all" process will transform the coordinates between the sources and the drawing when needed, you can select a CRS for those sources without a defined CRS (if any). You will find the following options:
- Drawing CRS (if defined)
- CRS defined in another source that has been included in the current "Import-all" process (if any)
- Other CRS, which can be selected using the same ways as when you run any Import process. Please, take a look at this article
- Since the "Import all" process will transform the coordinates between the sources and the drawing when needed, you can select a CRS for those sources without a defined CRS (if any). You will find the following options:
- Working path
- Defines a location where the application will save any auxiliary files required throughout the Import-all process
- For example, Raster image files created when importing images that need to be transformed (coordinate transformation, etc.)
- If this parameter is left blank, the application will ask you where to save each auxiliary file when necessary
- Defines a location where the application will save any auxiliary files required throughout the Import-all process

Note: When using this function, if the drawing is unreferenced the most suitable CRS will be automatically assigned to the drawing
Is there any way to import in one go the content of all schemas in a User Data Source (UDS) or all tables in a schema or file (advanced batch import)
Yes, Spatial Manager™ for BricsCAD provides a functionality similar to that of the previous section when it comes to batch importing all schemas from a data source or all tables in a schema or file

What are the Tasks? ("Professional" edition only)
The Tasks in Spatial Manager™ for BricsCAD are the way you can save any import process and its parameters, that have been designed to let you run, whenever you want, repetitive processes for import data tables in BricsCAD. You can access Tasks through the "Task manager" area in the "SpatialManager" palette
The processes of importing tables from files, servers or data stores in BricsCAD may be executed on a regular basis and sometimes these processes require the introduction of several more or less complex parameters of the source and the importing process itself, performing a coordinate transformation between the origin and target (drawing), etc. Spatial Manager™ for BricsCAD brings to you the concept of “Task”, that allows you to store all needed operations and parameters for any import process of spatial information. Once all necessary operations and parameters are saved as a Task, you can then run it from the Task Manager whenever you need

How can I create a new Task? ("Professional" edition only)
You can create new Tasks in Spatial Manager™ for BricsCAD using the "New task" button in the "Task manager", but you can also create a new Task when you are defining an import process because you will then run the same application wizard. Any of these methods lets you run the process immediately and/or save it as a Task at the end of the wizard
In the same way as when you define the import processes, you will need to enter all the parameters to access the origin data table, the import process parameters, the coordinate system transformation parameters (if any), the name of the Task and a description of the Task (optional). All this data is saved into the "Task manager" as a new Task, until you want to delete it
Note: be careful if you select the option "Import only Features in the current view" because it will be also stored as a parameter in the Task and, when the Task be executed, the drawing view may be different from the current view

How can I execute one or more Tasks? ("Professional" edition only)
You can select one or more Tasks in the "Task manager" of Spatial Manager™ for BricsCAD using the CTRL and/or SHIFT keys. To execute the selected Tasks, use the right-click menu over any of the Task names and click on "Execute" or use the "Execute" button
All the executed Tasks will run one by one and import the incoming entities in the current drawing

When executing the Task(s) you will see the window showing all the actions performed by the Task(s) and, if you want to, you can cancel any process before the end

Can I see the Properties of a Task? ("Professional" edition only)
Yes, you can see the Properties of the selected Task (only one) in the "Properties" area of the Spatial Manager™ for BricsCAD palette

Can I sort the Tasks in the "Task manager"? ("Professional" edition only)
You cannot change the relative positions of the Tasks in the "Task manager", but you can sort the Tasks in Spatial Manager™ for BricsCAD by selecting the "Sort" button as follows:
- Group by source: you will see the Tasks grouped by their source data source
- Plain list: you will see a list of all Tasks sorted by date of creation

Are there any other functions for the Tasks? ("Professional" edition only)
Yes, you can Delete and Rename the Tasks in Spatial Manager™ for BricsCAD using the right-click menu over the Task item (only one), in the "Task manager". You can also "Refresh" the Task list, using the "Refresh" button in the "Task manager", if you make changes to your data sources in the current work session


Can I run Importing processes in the Command Line?
Yes, Spatial Manager™ for BricsCAD includes the command '-SPMIMPORT' that allows you to execute any saved Task in the Command Line
The command syntax is -SPMIMPORT [Task name]
Since the parameter "Task name" support wildcards, you can process multiple Tasks simultaneously (batch processing) and use it in "BricsCAD Scripts"

Related links
- See "Providers" also
- Blog posts
- Point coordinates also as data fields
- Choose 3D or 2D when importing
- The powerful “Tasks” come in
- Speed up when importing heavy sources
- Quick Thematics in BricsCAD
- Hyperlinks in Data fields
- New release 3.2. 'Blocks' enhancements
- Labeling objects while importing
- Labeling Polylines too. ‘Smart’ labels and …
- Support for Ordnance Survey – Schema 9 products
- Graphic Filter while Importing in CAD
- Little-known options when importing from OpenStreetMap
- Improve performance when importing from OpenStreetMap
- Enhanced ASCII data provider (CSV, TXT, ASC, XYZ, …)
- Command-line Importing. Scripts
- From Excel to CAD drawings: quick and easy
- Small automated things that make your life easier
- The powerful ‘Import-all’ tool
- ‘Import-all’ function Enhancements
- Import Hatches properties
- Coordinate Systems and Transformations detailed info
- Importing geo-referenced Raster Images
- Importing LiDAR data
- Creating thematic maps while importing
- Tricks to optimize labeling while importing
- Import as 2D or 3D objects
- Import from Palette vs using SPMIMPORT
- Managing Multi-Polygons in BricsCAD
- Adding OpenStreetMap or Google Maps objects to your maps
- Now also Import-All Tables from UDSs or files
- Lightning Speed Areas Labeling
- Batch Import (OpenStreetMap sample)
- Labeling objects while importing: New options…
- Area filter when ‘Importing all’
- Capture and import Google Earth images (.geprint)
- Load or import multiple data sources at once
- Thematize by element type and attached data
- Contours and imported objects Label Masks
- ASCII data provider Tabular format
- Labeling data of objects in a drawing
- Spatial Filter parameter in Tasks
- Import points as Blocks from disk
- Combine native Attributes with data from tables
- Spatial filter envelope in WFS servers
- Extract 3D points from other objects
- Using custom Grid files
- Developed for other CAD applications prior to the release of Spatial Manager™ for BricsCAD but also applicable
- Technical pages
![]()
![]()