Difference between revisions of "Spatial Manager™ for BricsCAD - FAQs: Export ("Professional" edition only)"
m |
m |
||
| (34 intermediate revisions by 2 users not shown) | |||
| Line 1: | Line 1: | ||
| + | [[image:SPM BricsCAD Wiki to Website.png|150px|link=https://www.spatialmanager.com/spm-forbricscad/ |Spatial Manager™ for BricsCAD product page]] [[image:SPM BricsCAD Wiki to Download.png|150px|link=https://www.spatialmanager.com/download/spatial-manager-bricscad/ |Download Spatial Manager™ for BricsCAD]] | ||
| + | |||
| + | |||
| + | |||
| + | ''Notes:'' | ||
| + | *''Some components in the images on this page (providers, names, windows look, etc.) may be slightly different from those that will appear on your computer'' | ||
| + | *''Some application functions need to access the Internet from the application itself. If you experiment problems in any process, ask your network administrator if there is a Proxy server installed on your network. You can configure the [[Spatial_Manager%E2%84%A2_for_BricsCAD_-_FAQs:_Interface#Options|Proxy settings through the application options]]'' | ||
| + | |||
| + | |||
| + | |||
===Introduction=== | ===Introduction=== | ||
*'''Objective of this section''' | *'''Objective of this section''' | ||
| Line 15: | Line 25: | ||
| − | [[Image:SPMExportACAD52.png|border|'SPMEXPORT' command in the Spatial Manager™ for BricsCAD Ribbon (Can also be found in the drop-down Menu and Toolbar of Spatial Manager)]] | + | <span title="'SPMEXPORT' command in the Spatial Manager™ for BricsCAD Ribbon (Can also be found in the drop-down Menu and Toolbar of Spatial Manager)">[[Image:SPMExportACAD52.png|border|'SPMEXPORT' command in the Spatial Manager™ for BricsCAD Ribbon (Can also be found in the drop-down Menu and Toolbar of Spatial Manager)|link=]]</span> |
| Line 21: | Line 31: | ||
| − | [[Image:WizExportaCAD117.png|border|Export Parameters window]] | + | <span title="Export Parameters window">[[Image:WizExportaCAD117.png|border|Export Parameters window|link=]]</span> |
*'''Export selection''' | *'''Export selection''' | ||
**''Select all entities'': all entities in the drawing will be exported | **''Select all entities'': all entities in the drawing will be exported | ||
| − | **''Only selected entities'': only a selection of entities will be exported. You can select the entities before executing the Export function or by using the Selecting | + | **''Only selected entities'': only a selection of entities will be exported. You can select the entities before executing the Export function or by using the Selecting buttons in this window |
| + | ***Manual selection | ||
| + | ***Select by Query: select entities according to the result of a simplex or compound data query [[Spatial_Manager%E2%84%A2_for_BricsCAD_-_FAQs:_Advanced_Selection_(%22Standard%22_and_%22Professional%22_editions_only)#Can_I_define_a_selection_of_entities_based_on_the_values_of_their_data.3F|''(See "Selecting by Query")'']] | ||
| + | ***Select by Table: select entities which have been previously attached to a specific data table [[Spatial_Manager%E2%84%A2_for_BricsCAD_-_FAQs:_Advanced_Selection_(%22Standard%22_and_%22Professional%22_editions_only)#Can_I_select_all_the_entities_attached_to_the_same_data_table.3F|''(See "Selecting by Table")'']] | ||
| + | ***''Note: As you can select the entities previously to execute this command, in addition to the use of the above included selection options or in combination with them, you can make use of some other [[Spatial_Manager%E2%84%A2_for_BricsCAD_-_FAQs:_Advanced_Selection_(%22Standard%22_and_%22Professional%22_editions_only)|Advanced selection application tools]], select entities in the [[Spatial_Manager%E2%84%A2_for_BricsCAD_-_FAQs:_Data_Structure_Management_(%22Standard%22_and_%22Professional%22_editions_only)#Can_I_view_and_edit_the_entities_data_in_a_table_form.3F_.28.22Professional.22_edition_only.29|Data Grid]] or any other selection method available in BricsCAD (Quick Select, etc.). Also note that, as most of the advanced application or BricsCAD selection commands will let you apply the selection to the current selection, the number of possible combinations to select what you are interested in is almost unlimited | ||
**''Select entities in a layer'': only the entities included in a BricsCAD Layer will be exported. You can select this layer using the drop-down list in this window | **''Select entities in a layer'': only the entities included in a BricsCAD Layer will be exported. You can select this layer using the drop-down list in this window | ||
***''Note: When choosing the option to export all entities in the drawing, those entities that are in locked, off or frozen layers will not be included. If the entities are selected by any means before exporting and the option to export the selected entities is chosen, they will be exported even if they are in locked, off or frozen layers'' | ***''Note: When choosing the option to export all entities in the drawing, those entities that are in locked, off or frozen layers will not be included. If the entities are selected by any means before exporting and the option to export the selected entities is chosen, they will be exported even if they are in locked, off or frozen layers'' | ||
*'''Export object data (options tree)''' | *'''Export object data (options tree)''' | ||
| + | **''Unique key field'': when checked, the data table will include an new Unique Key Field (numerical consecutive) ('AdSPMKey). This Field will be defined as Primary Key, if the target data provider uses Keys (SQL Server Spatial, PostGIS, SQLite, etc.) | ||
**''Extended Entity Data (EED)'': the exported data Table will include the entities data (EED/XDATA). You can choose which Tables and/or Fields will be exported | **''Extended Entity Data (EED)'': the exported data Table will include the entities data (EED/XDATA). You can choose which Tables and/or Fields will be exported | ||
| − | **'' | + | **''General'': when checked any of the following, the data Table will include new Fields for the corresponding BricsCAD entity properties |
| − | **'' | + | ***''Handle ('dwg_handle')'' |
| − | **'' | + | ***''Color ('Color')'' |
| + | ***''Layer ('Layer')'' | ||
| + | ***''Line type ('Linetype')'' | ||
| + | ***''Line weight ('Lineweight')'' | ||
| + | ***''Hyperlink ('Hyperlink')'' | ||
| + | ***''Thickness ('Thickness')'' | ||
**''Blocks data'': when checked any of the following, the data Table will include new Fields for the corresponding data of the Block References (if any) | **''Blocks data'': when checked any of the following, the data Table will include new Fields for the corresponding data of the Block References (if any) | ||
***''Name and Attributes ('BlkName') ('Attribute Names')'' | ***''Name and Attributes ('BlkName') ('Attribute Names')'' | ||
| Line 58: | Line 78: | ||
***''Area'': when checked, the data Table will include a new Field ('Area') whose value will be the Area of the entities | ***''Area'': when checked, the data Table will include a new Field ('Area') whose value will be the Area of the entities | ||
*'''Other''' | *'''Other''' | ||
| − | **''Treat closed polylines as polygons'': when checked, all closed Polylines in the drawing will be exported to the target as Polygon features. Most of the time the closed polylines represent polygonal elements in the target data format and this conversion can be automatic | + | **''Treat closed polylines as polygons'': when checked (default value), all closed Polylines in the drawing will be exported to the target as Polygon features. Most of the time the closed polylines represent polygonal elements in the target data format and this conversion can be automatic |
| + | ***''Note: Be aware that, in order to avoid forgetting entities, in this case and in any other case where polygonal entities are exported to a polyline-type target, the polygon contours will be exported as polylines'' | ||
**''Also export fields with null values'' | **''Also export fields with null values'' | ||
***If not checked (default value): when you export to a target table with uniform fields structure (such as Shapefiles SHP), the table will include any field which have a non-null value in at least one entity of the export selection. When you export to a target table with non-uniform fields structure (such as KML), each entity will only include the fields which have a non-null value for the entity itself | ***If not checked (default value): when you export to a target table with uniform fields structure (such as Shapefiles SHP), the table will include any field which have a non-null value in at least one entity of the export selection. When you export to a target table with non-uniform fields structure (such as KML), each entity will only include the fields which have a non-null value for the entity itself | ||
| Line 71: | Line 92: | ||
"Back" button: As in the other application wizards, you will find the "Back" button in each step of the wizards in order to modify or add any previously introduced parameter. In the case of the "Export" wizard, this button is present even in the last step of the wizard and is applicable even after the export process is finished. Thus, if you detect that the export has failed or been incomplete due to some erroneous or partial parameter, you can comfortably repeat the process by modifying the wrong parameter(s) without having to modify any other | "Back" button: As in the other application wizards, you will find the "Back" button in each step of the wizards in order to modify or add any previously introduced parameter. In the case of the "Export" wizard, this button is present even in the last step of the wizard and is applicable even after the export process is finished. Thus, if you detect that the export has failed or been incomplete due to some erroneous or partial parameter, you can comfortably repeat the process by modifying the wrong parameter(s) without having to modify any other | ||
| + | *''Tip: This tool can be an interesting time saver when you are exporting several types of entities to some target that only supports one particular type of entity. For example, assume you want to export all the entities in the drawing (linear, polygonal, points) to Shapefiles. You can select to export "All entities" but when you define the type of feature that the Shapefile will contain you can only choose one type, since this is a limitation of Shapefiles. The application will filter the entities that can be exported to the chosen Shapefile type. But, once the export is finished, the "Back" button will allow you to choose another type of feature for the target Shapefile without modifying any other settings (entity parameters, coordinate transformation, etc.) to quickly export the new type entities to another Shapefile'' | ||
| + | **''Note: The "Automatic" option that can be found when exporting to Shapefiles, also simplifies this task because the export process will automatically create a different Shapefile for each entity type (Point, Polyline, etc.)'' | ||
| − | [[Image:BackExportCAD.png|border|"Back" button on the last wizard step]] | + | <span title="'Back' button on the last wizard step">[[Image:BackExportCAD.png|border|"Back" button on the last wizard step|link=]]</span> |
| Line 81: | Line 104: | ||
| − | [[Image:DataSEACAD2.png|border|Export destination]] | + | <span title="Export destination">[[Image:DataSEACAD2.png|border|Export destination|link=]]</span> |
First, you select the destination for the exported data: a file or a table inside a file or a database (or inside a schema of a file or a database) | First, you select the destination for the exported data: a file or a table inside a file or a database (or inside a schema of a file or a database) | ||
| − | [[Image:DataPRACAD.png | + | <span title="Export target file">[[Image:DataPRACAD.png|Export target file|link=]]</span> |
Next, you select a file type (the data provider). This step is not required if you have selected a UDS-based destination which defines its own data provider and the provider parameters (such as a SQLite table, PostGIS table, a UDS for a file, etc.) | Next, you select a file type (the data provider). This step is not required if you have selected a UDS-based destination which defines its own data provider and the provider parameters (such as a SQLite table, PostGIS table, a UDS for a file, etc.) | ||
| − | [[Image:ParamACAD2.png|border|Data provider connection parameters]] | + | <span title="Data provider connection parameters">[[Image:ParamACAD2.png|border|Data provider connection parameters|link=]]</span> |
Then, you configure the export data provider connection parameters, if needed ''(Image: sample of the KML/KMZ files data provider)'' | Then, you configure the export data provider connection parameters, if needed ''(Image: sample of the KML/KMZ files data provider)'' | ||
| + | |||
| + | |||
| + | ''Note: Although the application main palette [[Spatial_Manager™_for_BricsCAD_-_FAQs:_Data_sources | (see Data sources)]] is the primary tool to manage resources and accesses, create/edit [[Spatial_Manager™_for_BricsCAD_-_FAQs:_Data_sources#What_are_the_Shortcuts.3F | Shortcuts]] and [[Spatial_Manager™_for_BricsCAD_-_FAQs:_Data_sources#What_are_the_User_Data_Sources_.28UDSs.29.3F_.28.22Standard.22_and_.22Professional.22_editions_only.29 | User Data Sources (UDS)]], and other related functions, the context menus (righ-click) in this Export window, will also allow you to execute many of these functions "on the fly", without having to return to the main palette'' | ||
| + | |||
| + | |||
| + | <span title="Contextual options in the Export window">[[Image:SPMExportRC.png|border|Contextual options in the Export window|link=]]</span> | ||
| + | |||
| Line 105: | Line 135: | ||
If the application "knows", "guesses" or "can assume" the CRS of the source and/or the target data, they will be chosen by default. You will be able to modify this choice, except in cases where only one CRS is valid; for example, for a KML or a KMZ file the only valid choice is the CRS WGS84 (SRID 4326), because these types of file are always defined using this CRS | If the application "knows", "guesses" or "can assume" the CRS of the source and/or the target data, they will be chosen by default. You will be able to modify this choice, except in cases where only one CRS is valid; for example, for a KML or a KMZ file the only valid choice is the CRS WGS84 (SRID 4326), because these types of file are always defined using this CRS | ||
| − | You can assign a CRS to the drawing, or modify it, using the command 'SPMSETCRS'. By executing this command you will access the CRS Catalog of the application, described in the previous lines. In this case the Type "Projected" will be selected by default because is the most common choice | + | You can assign a CRS to the drawing, or modify it, using the command 'SPMSETCRS'. By executing this command, you will access the CRS Catalog of the application, described in the previous lines. In this case the Type "Projected" will be selected by default because is the most common choice |
*When exporting: | *When exporting: | ||
**Those entities without assigned CRS will adopt the CRS of the drawing in the Transformation of coordinates | **Those entities without assigned CRS will adopt the CRS of the drawing in the Transformation of coordinates | ||
| Line 118: | Line 148: | ||
| − | [[Image:TC15ACAD22.png|border|Access to the CRS Catalog of the application]] | + | <span title="Access to the CRS Catalog of the application">[[Image:TC15ACAD22.png|border|Access to the CRS Catalog of the application|link=]]</span> |
| + | |||
| + | |||
| + | <span title="CRS Catalog of the application">[[Image:TC-3.PNG|border|CRS Catalog of the application|link=]]</span> | ||
| + | |||
| + | |||
| + | <span title="'SPMSETCRS' command in the Spatial Manager™ for BricsCAD Ribbon (Can also be found in the drop-down Menu and Toolbar of Spatial Manager)">[[Image:SPMSetCrBCAD25-2.png|border|'SPMSETCRS' command in the Spatial Manager™ for BricsCAD Ribbon (Can also be found in the drop-down Menu and Toolbar of Spatial Manager)|link=]]</span> | ||
| − | [[Image: | + | <span title="Last used CRSs in the Catalog window">[[Image:SPMSetCrsLast.png|border|Last used CRSs in the Catalog window|link=]]</span> |
| − | + | *''Notes about transformation Grid files:'' | |
| + | **''Some coordinate transformations (NTv2, etc.) require one or more Grid files in order to be processed. Some of the most commonly used Grid files worldwide are included in the application, but you can see that some others instruct you on where to download Grid file(s) not included with the application (usually a download URL)'' | ||
| + | **''On the other hand, even if the required Grid file(s) already exists (included as standard in the application, or previously downloaded by the user), the application allows the user to choose an alternative Grid file(s) so that he can use more accurate or updated Grid transformations when more appropriated files are available. This custom choice for a Grid file is kept by default for a work session, but will not be memorized when exiting and re-entering the application'' | ||
| − | [[ | + | <span title="Selecting alternative Grid files">[[image:SPMSelGridCRSFile.png|border|link=]]</span> |
| Line 138: | Line 176: | ||
| − | [[Image:SpatialManagerforBricsCAD-ExportGEButton2.png|border|Export to Google Earth (KML/KMZ) Ribbon button (Can also be found in the drop-down Menu and Toolbar of Spatial Manager)]] | + | <span title="Export to Google Earth (KML/KMZ) Ribbon button (Can also be found in the drop-down Menu and Toolbar of Spatial Manager)">[[Image:SpatialManagerforBricsCAD-ExportGEButton2.png|border|Export to Google Earth (KML/KMZ) Ribbon button (Can also be found in the drop-down Menu and Toolbar of Spatial Manager)|link=]]</span> |
| Line 144: | Line 182: | ||
| − | [[Image:Export to KML 2.png|border|Open file in Google Earth (if installed) or open file location]] | + | <span title="Open file in Google Earth (if installed) or open file location">[[Image:Export to KML 2.png|border|Open file in Google Earth (if installed) or open file location|link=]]</span> |
| − | [[Image:Export to KML 42.png|border|The file in Google Earth]] | + | <span title="The file in Google Earth">[[Image:Export to KML 42.png|border|The file in Google Earth|link=]]</span> |
| − | You can export all the | + | You can export all the entities in a drawing, a selection of entities (Manual, [[Spatial_Manager%E2%84%A2_for_BricsCAD_-_FAQs:_Advanced_Selection_(%22Standard%22_and_%22Professional%22_editions_only)#Can_I_define_a_selection_of_entities_based_on_the_values_of_their_data.3F|''by Query'']] or |
| + | [[Spatial_Manager%E2%84%A2_for_BricsCAD_-_FAQs:_Advanced_Selection_(%22Standard%22_and_%22Professional%22_editions_only)#Can_I_select_all_the_entities_attached_to_the_same_data_table.3F|''by Table'']]), or all the entities in a Layer | ||
| − | '' | + | *''Notes:'' |
| + | **''Please take a look at the notes in the first article of this chapter in order to read more about many other advanced selection options'' | ||
| + | **''When choosing the option to export all entities in the drawing, those entities that are in locked, off or frozen layers will not be included. If the entities are selected by any means before exporting and the option to export the selected entities is chosen, they will be exported even if they are in locked, off or frozen layers'' | ||
| − | [[Image:Export to GE selection 4.png|border|Publish to Google Earth (KML/KMZ) parameters window]] | + | <span title="Publish to Google Earth (KML/KMZ) parameters window">[[Image:Export to GE selection 4.png|border|Publish to Google Earth (KML/KMZ) parameters window|link=]]</span> |
| Line 161: | Line 202: | ||
| − | [[Image:Fill Pol when Publish GE.png|border|Filling closed Polylines in Google Earth]] | + | <span title="Filling closed Polylines in Google Earth">[[Image:Fill Pol when Publish GE.png|border|Filling closed Polylines in Google Earth|link=]]</span> |
| Line 167: | Line 208: | ||
| − | [[Image:KML_Reduce_image_Size.png|border|Reducing the size of images when publishing]] | + | <span title="Reducing the size of images when publishing">[[Image:KML_Reduce_image_Size.png|border|Reducing the size of images when publishing|link=]]</span> |
| Line 173: | Line 214: | ||
| − | [[Image:SPMSetCrBCAD25-2.png|border|'SPMSETCRS' command in the Spatial Manager™ for BricsCAD Ribbon (Can also be found in the drop-down Menu and Toolbar of Spatial Manager)]] | + | <span title="'SPMSETCRS' command in the Spatial Manager™ for BricsCAD Ribbon (Can also be found in the drop-down Menu and Toolbar of Spatial Manager)">[[Image:SPMSetCrBCAD25-2.png|border|'SPMSETCRS' command in the Spatial Manager™ for BricsCAD Ribbon (Can also be found in the drop-down Menu and Toolbar of Spatial Manager)|link=]]</span> |
| Line 189: | Line 230: | ||
| − | [[Image:SegementedACAD2.png|border|Circle segmentation]] | + | <span title="Circle segmentation">[[Image:SegementedACAD2.png|border|Circle segmentation|link=]]</span> |
''Sample: segmentation of a BricsCAD Circle when exported to a Polygons Shapefile (SHP)'' | ''Sample: segmentation of a BricsCAD Circle when exported to a Polygons Shapefile (SHP)'' | ||
| Line 199: | Line 240: | ||
| − | [[Image:EED-1.png|border|EEDs to be exported]] | + | <span title="EEDs to be exported">[[Image:EED-1.png|border|EEDs to be exported|link=]]</span> |
| + | |||
| + | |||
| + | |||
| + | ===Can I Export directly from a data source to another without first importing into BricsCAD?=== | ||
| + | Yes, you can directly Export/Convert from a data source to any supported data target by using the data sources contextual menu (righ-click) in the Main Spatial Manager™ for BricsCAD palette. This functionality allows you to run Export processes without having to previously import the elements from the source data table into a BricsCAD drawing, and you will find similar options (coordinate system transformation, etc.) to those you can find when exporting BricsCAD entities | ||
| + | |||
| + | |||
| + | <span title="Direct Export function">[[Image:SPMDirectExport.png|Direct Export function|link=]]</span> | ||
| + | |||
| + | |||
| + | <span title="Direct Export parameters and options">[[Image:SPMDirectExport 2.png|Direct Export parameters and options|link=]]</span> | ||
| Line 205: | Line 257: | ||
==Related links== | ==Related links== | ||
*[[Spatial Manager™ for BricsCAD - FAQs: Providers|See "Providers" also]] | *[[Spatial Manager™ for BricsCAD - FAQs: Providers|See "Providers" also]] | ||
| − | *[ | + | *[https://www.spatialmanager.com/now-export-from-cad-to-google-earth-shapefiles-etc/ Now EXPORT from CAD to Google Earth, Shapefiles, etc.] |
| − | *[ | + | *[https://www.spatialmanager.com/export-blocks-and-external-references-to-google-earth/ Export Blocks and External References to Google Earth] |
| − | *[ | + | *[https://www.spatialmanager.com/new-release-3-2-the-blocks-version/ New release 3.2. 'Blocks' enhancements] |
| − | *[ | + | *[https://www.spatialmanager.com/publishing-your-drawing-or-map-in-google-earth-one-click/ Publishing your drawing or map in Google Earth (one click)] |
| − | *[ | + | *[https://www.spatialmanager.com/fill-polylines-while-publishing-in-google-earth/ Fill Polylines while Publishing in Google Earth] |
| − | *[ | + | *[https://www.spatialmanager.com/texts-to-labels-when-publishing-to-google-earth/ Texts to Labels when Publishing to Google Earth] |
| − | *[ | + | *[https://www.spatialmanager.com/exporting-images-to-google-earth-too/ Exporting images to Google Earth too] |
| − | *[ | + | *[https://www.spatialmanager.com/reducing-images-size-when-publishing-to-google-earth/ Reducing images size when Publishing to Google Earth] |
| − | *[ | + | *[https://www.spatialmanager.com/export-and-import-the-hatches-properties/ Export Hatches properties] |
| − | *[ | + | *[https://www.spatialmanager.com/getting-the-z-coordinate-from-labels-content/ Getting the Z-coordinate from labels content] |
| − | *[ | + | *[https://www.spatialmanager.com/replaying-an-erroneus-export-process/ Replaying an erroneus export process] |
| − | *[ | + | *[https://www.spatialmanager.com/new-write-functionality-for-gml-export/ New write functionality for GML export] |
| − | *[ | + | *[https://www.spatialmanager.com/two-ways-to-bring-your-drawings-or-maps-to-google-earth/ Two ways to bring your drawings to Google Earth] |
| + | *[https://www.spatialmanager.com/roads-and-streets-profiles-from-your-dwgs-or-maps/ Road and street profiles from your DWGs] | ||
| + | *[https://www.spatialmanager.com/exporting-3d-to-google-earth-kml-kmz/ Exporting 3D to Google Earth (KML, KMZ)] | ||
| + | *[https://www.spatialmanager.com/shapefiles-shp-multi-class-export/ Shapefiles (SHP) Multi-class export] | ||
| + | *[https://www.spatialmanager.com/geospatial-direct-exporting/ Geospatial direct Exporting] | ||
*[[Spatial Manager™ for BricsCAD#FAQs|Go to FAQS]] | *[[Spatial Manager™ for BricsCAD#FAQs|Go to FAQS]] | ||
| + | |||
| + | |||
| + | |||
| + | [[image:SPM BricsCAD Wiki to Website.png|150px|link=https://www.spatialmanager.com/spm-forbricscad/ |Spatial Manager™ for BricsCAD product page]] [[image:SPM BricsCAD Wiki to Download.png|150px|link=https://www.spatialmanager.com/download/spatial-manager-bricscad/ |Download Spatial Manager™ for BricsCAD]] | ||
Revision as of 14:31, 16 June 2021
![]()
![]()
Notes:
- Some components in the images on this page (providers, names, windows look, etc.) may be slightly different from those that will appear on your computer
- Some application functions need to access the Internet from the application itself. If you experiment problems in any process, ask your network administrator if there is a Proxy server installed on your network. You can configure the Proxy settings through the application options
Introduction
- Objective of this section
- To learn how to define export processes and their parameters and manage coordinate transformations
- Topics in this section
- Targets: data sources
- Export parameters (Fields, Texts data, Points coordinates, etc.), BricsCAD entities selection, entities report, treat closed Polylines as Polygons
- One-click export to Google Earth ("Standard" and "Professional" editions)
- Transforming the coordinates: source and target, last used coordinate systems, searching in the coordinate systems table and transformation parameters
How can I Export BricsCAD entities as spatial features?
You can export BricsCAD entities as spatial features into files or databases by executing the 'SPMEXPORT' command of Spatial Manager™ for BricsCAD, which you will find in the "Spatial Manager" ribbon, toolbar or drop-down menu. This will launch the "Export" wizard of the application, which shares some of the steps with the Import wizard. The command not only exports the selected entities but saves their Extended Entity Data (EED/XDATA) as data tables (see below). Upon completion of any export process to a file, you can directly open the file location. When exporting to a KML or KMZ file you can choose to open the file in Google Earth (if installed)
")
While running the "Export" wizard, you can select the export parameters that match your needs:

- Export selection
- Select all entities: all entities in the drawing will be exported
- Only selected entities: only a selection of entities will be exported. You can select the entities before executing the Export function or by using the Selecting buttons in this window
- Manual selection
- Select by Query: select entities according to the result of a simplex or compound data query (See "Selecting by Query")
- Select by Table: select entities which have been previously attached to a specific data table (See "Selecting by Table")
- Note: As you can select the entities previously to execute this command, in addition to the use of the above included selection options or in combination with them, you can make use of some other Advanced selection application tools, select entities in the Data Grid or any other selection method available in BricsCAD (Quick Select, etc.). Also note that, as most of the advanced application or BricsCAD selection commands will let you apply the selection to the current selection, the number of possible combinations to select what you are interested in is almost unlimited
- Select entities in a layer: only the entities included in a BricsCAD Layer will be exported. You can select this layer using the drop-down list in this window
- Note: When choosing the option to export all entities in the drawing, those entities that are in locked, off or frozen layers will not be included. If the entities are selected by any means before exporting and the option to export the selected entities is chosen, they will be exported even if they are in locked, off or frozen layers
- Export object data (options tree)
- Unique key field: when checked, the data table will include an new Unique Key Field (numerical consecutive) ('AdSPMKey). This Field will be defined as Primary Key, if the target data provider uses Keys (SQL Server Spatial, PostGIS, SQLite, etc.)
- Extended Entity Data (EED): the exported data Table will include the entities data (EED/XDATA). You can choose which Tables and/or Fields will be exported
- General: when checked any of the following, the data Table will include new Fields for the corresponding BricsCAD entity properties
- Handle ('dwg_handle')
- Color ('Color')
- Layer ('Layer')
- Line type ('Linetype')
- Line weight ('Lineweight')
- Hyperlink ('Hyperlink')
- Thickness ('Thickness')
- Blocks data: when checked any of the following, the data Table will include new Fields for the corresponding data of the Block References (if any)
- Name and Attributes ('BlkName') ('Attribute Names')
- Rotation ('BlkRotation')
- Scales ('BlkXscale', 'BlkYscale', 'BlkZscale')
- Texts data: when checked any of the following, the data Table will include new Fields for the corresponding data of the Text entities (if any)
- Contents ('TxtString')
- Rotation ('TxtRotation')
- Height ('TxtHeight')
- Hatches pattern data: when checked any of the following, the data Table will include new Fields for the corresponding data of the Hatch objects (if any)
- Name ('HPatName')
- Angle ('HPatAngle')
- Scale (Spacing for User patterns) ('HPatScale')
- Double (User patterns) ('HPatDouble')
- Geometry
- Elevation: when checked, the data Table will include a new Field ('Elevation') whose value will be the Elevation of the entities
- Note: Regardless this option, the application will use the entity Elevation as Z-coordinate when exporting any XY-only entity (Circles, Polylines, etc.)
- Point coordinates: when checked any of the following, the data Table will include new Fields for the corresponding X/Y/Z Coordinate values of the Point-type entities (if any)
- X
- Y
- Z
- Note: If the Coordinates are Transformed along the Exporting process (see this paragraph), the Transformed values will be exported instead of the original values
- Length: when checked, the data Table will include a new Field ('Length') whose value will be the Length of the entities
- Area: when checked, the data Table will include a new Field ('Area') whose value will be the Area of the entities
- Elevation: when checked, the data Table will include a new Field ('Elevation') whose value will be the Elevation of the entities
- Other
- Treat closed polylines as polygons: when checked (default value), all closed Polylines in the drawing will be exported to the target as Polygon features. Most of the time the closed polylines represent polygonal elements in the target data format and this conversion can be automatic
- Note: Be aware that, in order to avoid forgetting entities, in this case and in any other case where polygonal entities are exported to a polyline-type target, the polygon contours will be exported as polylines
- Also export fields with null values
- If not checked (default value): when you export to a target table with uniform fields structure (such as Shapefiles SHP), the table will include any field which have a non-null value in at least one entity of the export selection. When you export to a target table with non-uniform fields structure (such as KML), each entity will only include the fields which have a non-null value for the entity itself
- If checked: in all cases, each entity and thus the entire table, will include all the fields (null or non-null)
- Treat closed polylines as polygons: when checked (default value), all closed Polylines in the drawing will be exported to the target as Polygon features. Most of the time the closed polylines represent polygonal elements in the target data format and this conversion can be automatic
- Entities report: the application shows here the total number of the entities which will be exported and any warnings prior to the export process, such as the total number of unsupported entities which will not be exported or others
When duplicate Fields will be automatically Renamed (by adding a correlative suffix) in the exported Tables?
- When there are Fields that can be found in different Tables having the same Name but different Type. So that, those that can be found in different Tables but having the same Name and the same Type are considered as a single field
- When a Field (for example "X") already exists for any object, and the export options force to add a Field with the same name (such as the "X" coordinate of the points)
"Back" button: As in the other application wizards, you will find the "Back" button in each step of the wizards in order to modify or add any previously introduced parameter. In the case of the "Export" wizard, this button is present even in the last step of the wizard and is applicable even after the export process is finished. Thus, if you detect that the export has failed or been incomplete due to some erroneous or partial parameter, you can comfortably repeat the process by modifying the wrong parameter(s) without having to modify any other
- Tip: This tool can be an interesting time saver when you are exporting several types of entities to some target that only supports one particular type of entity. For example, assume you want to export all the entities in the drawing (linear, polygonal, points) to Shapefiles. You can select to export "All entities" but when you define the type of feature that the Shapefile will contain you can only choose one type, since this is a limitation of Shapefiles. The application will filter the entities that can be exported to the chosen Shapefile type. But, once the export is finished, the "Back" button will allow you to choose another type of feature for the target Shapefile without modifying any other settings (entity parameters, coordinate transformation, etc.) to quickly export the new type entities to another Shapefile
- Note: The "Automatic" option that can be found when exporting to Shapefiles, also simplifies this task because the export process will automatically create a different Shapefile for each entity type (Point, Polyline, etc.)

How can I configure the spatial Target when exporting from BricsCAD?
When you export using Spatial Manager™ for BricsCAD you must to select the exporting destination. If needed, you must also select the data provider and its parameters

First, you select the destination for the exported data: a file or a table inside a file or a database (or inside a schema of a file or a database)

Next, you select a file type (the data provider). This step is not required if you have selected a UDS-based destination which defines its own data provider and the provider parameters (such as a SQLite table, PostGIS table, a UDS for a file, etc.)

Then, you configure the export data provider connection parameters, if needed (Image: sample of the KML/KMZ files data provider)
Note: Although the application main palette (see Data sources) is the primary tool to manage resources and accesses, create/edit Shortcuts and User Data Sources (UDS), and other related functions, the context menus (righ-click) in this Export window, will also allow you to execute many of these functions "on the fly", without having to return to the main palette

How can I define a Transformation of coordinates when exporting?
When you are Exporting BricsCAD entities as spatial Features using Spatial Manager™ for BricsCAD, you will see that you can choose a Transformation of coordinates from the source to the target, in the "Export" wizard. This means that the application will calculate a geometric transformation between the source and the target data, which will depend on the chosen CRS for the source (drawing) and for the target (outgoing Features) data. You can choose the appropriate CRSs by clicking on "CRS catalog...", in the CRS dropdown list for the source or for the target data. In the CRS table you can:
- Filter the CRSs by type (Geocentric, Projected, etc.)
- Choose a CRS by clicking on its row in the table
- Search CRSs by typing the search criteria in the "Search" box. You can type as many words as you like here,separated by blanks. The application will find all the rows which include all these words in any column of the table
After choosing a pair of valid CRS for a Transformation, you can choose the geographic Area to apply it to (the application will choose by default the most common Area for this Transformation)
If the application "knows", "guesses" or "can assume" the CRS of the source and/or the target data, they will be chosen by default. You will be able to modify this choice, except in cases where only one CRS is valid; for example, for a KML or a KMZ file the only valid choice is the CRS WGS84 (SRID 4326), because these types of file are always defined using this CRS
You can assign a CRS to the drawing, or modify it, using the command 'SPMSETCRS'. By executing this command, you will access the CRS Catalog of the application, described in the previous lines. In this case the Type "Projected" will be selected by default because is the most common choice
- When exporting:
- Those entities without assigned CRS will adopt the CRS of the drawing in the Transformation of coordinates
- If all the entities to export have the same assigned CRS and the drawing has not an assigned CRS, the Transformation of coordinates will take the CRS of the entities as the source CRS by default
- Notes:
- To unassign (undefine) the Coordinate System of the drawing, choose "Undefined CRS" (EPSG 0)
- As you will see, the CRS dropdown lists will include more and more CRSs as they have been previously chosen in other Transformation operations, so that you can choose your "last-used" CRSs directly from the dropdown list without having to access the CRS Catalog all the time. In addition, the CRS Catalog window shown when you execute 'SPMSETCRS' to assign a CRS to the drawing, or modify it, also includes a list of the "last-used" CRSs (if any) in the upper zone
- Coordinate Systems and Transformation details
- Coordinate Systems objects available in the current version


")

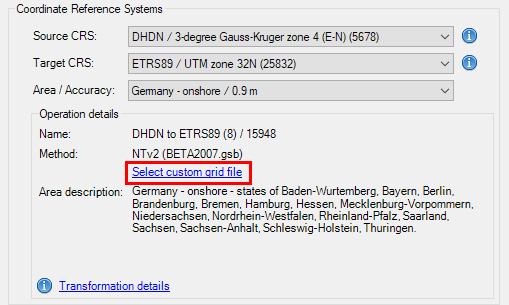
- Notes about transformation Grid files:
- Some coordinate transformations (NTv2, etc.) require one or more Grid files in order to be processed. Some of the most commonly used Grid files worldwide are included in the application, but you can see that some others instruct you on where to download Grid file(s) not included with the application (usually a download URL)
- On the other hand, even if the required Grid file(s) already exists (included as standard in the application, or previously downloaded by the user), the application allows the user to choose an alternative Grid file(s) so that he can use more accurate or updated Grid transformations when more appropriated files are available. This custom choice for a Grid file is kept by default for a work session, but will not be memorized when exiting and re-entering the application
Can I quickly Export the current drawing status (Publish) to Google Earth ("Standard" and "Professional" editions)
Yes, you can. Regardless of the advanced Export capabilities of Spatial Manager™ for BricsCAD which can be found in the "Professional" edition, the "Standard" and "Professional" editions of the application include a specific command (SPMCREATEKML) designed to Export all or part of the entities in the drawing and their data, to a KML or KMZ file (Google Earth) through a one-click operation. This exportation process considers the current Layers organization and the properties of the Layers and entities
- The elements in the KML/KMZ file will assume the colors, line weights, etc. of the entities in the drawing. A subdivision based on the type(s) of the entities in the Layers will also be created for each Layer, allowing you a high level of visibility control in Google Earth
- The values for the NAME and DESCRIPTION of the elements in the KML/KMZ file will be automatically taken from the data fields "Name" and "Description" if those exist
- The Text entities will display their content as a Label in Google Earth (automatic Field "TxtString")
 Ribbon button (Can also be found in the drop-down Menu and Toolbar of Spatial Manager)")
The Exported (KML/KMZ) file can now be opened in Google Earth. As an extra, if Google Earth is installed on the computer where the Export process was performed you can even open it using a button in the Export report window. Nevertheless, upon completion of the Export process you can open the file location directly
 or open file location")

You can export all the entities in a drawing, a selection of entities (Manual, by Query or
by Table), or all the entities in a Layer
- Notes:
- Please take a look at the notes in the first article of this chapter in order to read more about many other advanced selection options
- When choosing the option to export all entities in the drawing, those entities that are in locked, off or frozen layers will not be included. If the entities are selected by any means before exporting and the option to export the selected entities is chosen, they will be exported even if they are in locked, off or frozen layers
 parameters window")
As an additonal parameter, you can select the option to Fill the closed Polylines as if they were Polygons. Note that if you check this option, and a Polyline is already filled in the drawing (using a Hatch, for example) you will get two polygon elements for this Polyline in the exported KML/KMZ file

In addition, if the set of objects to be published includes any BricsCAD raster images, you can reduce their size by a percentage while processing. This can help you solve some of the problems in Google Earth concerning large images, which cause them to be missed or cropped

The application needs to know the Coordinate System (CRS) of the drawing for Exporting, as in most cases this will be necessary to perform an automatic coordinate transformation to the CRS used in Google Earth. You will see a Warning window if the process cannot be carried out and you may need to assign a CRS to the drawing
You can read about CRSs, the CRS Catalog and the Transformation of coordinates in the previous article
Is there any limitation or modification in the original entities when exporting?
Yes, there are some limitations and there may also be automatic changes in the entities when they are exported using Spatial Manager™ for BricsCAD
- Limitations:
- Filtering of incompatible entities: there are a few entity types not supported by the export processes (such as Texts, MTexts or complex 3D entities) which are automatically filtered. The filter result is displayed before exporting on the "Entities report" of the first exporting wizard window
- Modifications
- Some entities, such as Blocks or External References, are exported as Point Features (Insertion Points). In the case of the Blocks or XRef, you must Explode them before exporting if you want to export their internal entities. The "Entities report" in the first exporting wizard window also warns the user about the number of Blocks and XRef Insertions if any have been selected to export
- Automatic complex geometric operations: the application will review and edit the selected entities in order to export geometries accommodated in the target format

Sample: segmentation of a BricsCAD Circle when exported to a Polygons Shapefile (SHP)
How are the Extended Entity Data (EED/XDATA) exported?
If the selected entities to be exported have attached data (XDATA / EEDs), this entity data will also be exported as data tables linked to the outgoing Features, if the Target supports these data tables. The EED/XDATA can be attached when the entities are imported, by hand using the Data Structure Management tools or can be there by a combination of both cases. As you can see at the beginning of this chapter, you can choose which Tables and/or Fields will be exported

Can I Export directly from a data source to another without first importing into BricsCAD?
Yes, you can directly Export/Convert from a data source to any supported data target by using the data sources contextual menu (righ-click) in the Main Spatial Manager™ for BricsCAD palette. This functionality allows you to run Export processes without having to previously import the elements from the source data table into a BricsCAD drawing, and you will find similar options (coordinate system transformation, etc.) to those you can find when exporting BricsCAD entities


Related links
- See "Providers" also
- Now EXPORT from CAD to Google Earth, Shapefiles, etc.
- Export Blocks and External References to Google Earth
- New release 3.2. 'Blocks' enhancements
- Publishing your drawing or map in Google Earth (one click)
- Fill Polylines while Publishing in Google Earth
- Texts to Labels when Publishing to Google Earth
- Exporting images to Google Earth too
- Reducing images size when Publishing to Google Earth
- Export Hatches properties
- Getting the Z-coordinate from labels content
- Replaying an erroneus export process
- New write functionality for GML export
- Two ways to bring your drawings to Google Earth
- Road and street profiles from your DWGs
- Exporting 3D to Google Earth (KML, KMZ)
- Shapefiles (SHP) Multi-class export
- Geospatial direct Exporting
![]()
![]()