Difference between revisions of "Spatial Manager Desktop™ - FAQs: Import and export"
m |
m |
||
| (10 intermediate revisions by 2 users not shown) | |||
| Line 1: | Line 1: | ||
| − | [[image:SPM Desktop Wiki to Website.png|150px|link= | + | [[image:SPM Desktop Wiki to Website.png|150px|link=https://www.spatialmanager.com/spm-desktop/ |Spatial Manager Desktop™ product page]] [[image:SPM Desktop Wiki to Download.png|150px|link=https://www.spatialmanager.com/download/spatial-manager-desktop/ |Download Spatial Manager Desktop™]] |
| Line 30: | Line 30: | ||
| − | [[Image:EX-1B.png|border|Exporting Features from a File (whole Table)]] | + | <span title="Exporting Features from a File (whole Table)">[[Image:EX-1B.png|border|Exporting Features from a File (whole Table)|link=]]</span> |
| − | [[Image:EX-2B.png|border|Exporting Features from a UDS (whole Table)]] | + | <span title="Exporting Features from a UDS (whole Table)">[[Image:EX-2B.png|border|Exporting Features from a UDS (whole Table)|link=]]</span> |
| − | [[Image:EX-3B.png|border|Exporting Features from Layer (whole Layer)]] | + | <span title="Exporting Features from Layer (whole Layer)">[[Image:EX-3B.png|border|Exporting Features from Layer (whole Layer)|link=]]</span> |
| − | [[Image:EX-4B.png|border|Exporting the Selected Features]] | + | <span title="Exporting the Selected Features">[[Image:EX-4B.png|border|Exporting the Selected Features|link=]]</span> |
| Line 62: | Line 62: | ||
| − | [[Image:EX-5.png|border|Exporting Wizard - Destination]] | + | <span title="Exporting Wizard - Destination">[[Image:EX-5.png|border|Exporting Wizard - Destination|link=]]</span> |
| − | [[Image:EX-6.png|border|Exporting Wizard - Target parameters]] | + | <span title="Exporting Wizard - Target parameters">[[Image:EX-6.png|border|Exporting Wizard - Target parameters|link=]]</span> |
| − | [[Image:EX-72.png|border|Exporting Wizard - Transformation of Coordinates]] | + | <span title="Exporting Wizard - Transformation of Coordinates">[[Image:EX-72.png|border|Exporting Wizard - Transformation of Coordinates|link=]]</span> |
| − | [[Image:EX-8.png|border|Exporting Wizard - Task Name (when saved)]] | + | <span title="Exporting Wizard - Task Name (when saved)">[[Image:EX-8.png|border|Exporting Wizard - Task Name (when saved)|link=]]</span> |
| − | [[Image:EX-9.png|border|Exporting Wizard - Summary]] | + | <span title="Exporting Wizard - Summary">[[Image:EX-9.png|border|Exporting Wizard - Summary|link=]]</span> |
| − | [[Image:EX-10-2.png|border|Exporting Wizard - Execution grid]] | + | <span title="Exporting Wizard - Execution grid">[[Image:EX-10-2.png|border|Exporting Wizard - Execution grid|link=]]</span> |
| + | |||
| + | |||
| + | ''Note: Although the "Data sources" panel [[Spatial_Manager_Desktop™_-_FAQs:_Data_sources | (see Data sources)]] is the primary tool to manage resources and accesses, create/edit [[Spatial_Manager_Desktop™_-_FAQs:_Data_sources#What_are_the_Shortcuts.3F | Shortcuts]] and [[Spatial_Manager_Desktop™_-_FAQs:_Data_sources#What_are_the_User_Data_Sources_.28UDSs.29.3F_.28.22Standard.22_and_.22Professional.22_editions_only.29 | User Data Sources (UDS)]], and other related functions, the context menus (righ-click) in this Export window, will also allow you to execute many of these functions "on the fly", without having to return to the "Data sources" panel'' | ||
| + | |||
| + | |||
| + | <span title="Contextual options in the Export window">[[Image:SPMExportRC.png|border|Contextual options in the Export window|link=]]</span> | ||
| Line 85: | Line 91: | ||
| − | [[Image:EX-11.png|border|Importing to a selected data container]] | + | <span title="Importing to a selected data container">[[Image:EX-11.png|border|Importing to a selected data container|link=]]</span> |
| + | |||
| + | |||
| + | ''Note: Although the "Data sources" panel [[Spatial_Manager_Desktop™_-_FAQs:_Data_sources | (see Data sources)]] is the primary tool to manage resources and accesses, create/edit [[Spatial_Manager_Desktop™_-_FAQs:_Data_sources#What_are_the_Shortcuts.3F | Shortcuts]] and [[Spatial_Manager_Desktop™_-_FAQs:_Data_sources#What_are_the_User_Data_Sources_.28UDSs.29.3F_.28.22Standard.22_and_.22Professional.22_editions_only.29 | User Data Sources (UDS)]], and other related functions, the context menus (righ-click) in this Import window, will also allow you to execute many of these functions "on the fly", without having to return to the "Data sources" panel'' | ||
| + | |||
| + | |||
| + | <span title="Contextual options in the Import window">[[Image:SPMImportRC.png|border|Contextual options in the Import window|link=]]</span> | ||
| Line 96: | Line 108: | ||
| − | [[Image:Task-1.PNG|border|'Task Manager' panel]] | + | <span title="'Task Manager' panel">[[Image:Task-1.PNG|border|'Task Manager' panel|link=]]</span> |
| Line 104: | Line 116: | ||
| − | [[Image:Task-2.PNG|border|Creating a Task]] | + | <span title="Creating a Task">[[Image:Task-2.PNG|border|Creating a Task|link=]]</span> |
| Line 110: | Line 122: | ||
| − | [[Image:Task-3.PNG|border|Creating a Task - Source]] | + | <span title="Creating a Task - Source">[[Image:Task-3.PNG|border|Creating a Task - Source|link=]]</span> |
| − | [[Image:Task-4.PNG|border|Creating a Task - Destination]] | + | <span title="Creating a Task - Destination">[[Image:Task-4.PNG|border|Creating a Task - Destination|link=]]</span> |
| − | [[Image:Task-52.PNG|border|Creating a Task - Transformation of Coordinates]] | + | <span title="Creating a Task - Transformation of Coordinates">[[Image:Task-52.PNG|border|Creating a Task - Transformation of Coordinates|link=]]</span> |
| − | [[Image:Task-6.PNG|border|Creating a Task - Name]] | + | <span title="Creating a Task - Name">[[Image:Task-6.PNG|border|Creating a Task - Name|link=]]</span> |
| Line 131: | Line 143: | ||
| − | [[Image:Execute_Tasks.png|border|Executing a Task]] | + | <span title="Executing a Task">[[Image:Execute_Tasks.png|border|Executing a Task|link=]]</span> |
| Line 137: | Line 149: | ||
| − | [[Image:Task-9.png|border|Execution grid]] | + | <span title="Execution grid">[[Image:Task-9.png|border|Execution grid|link=]]</span> |
| − | [[Image:Task-8.png|border|Summary window]] | + | <span title="Summary window">[[Image:Task-8.png|border|Summary window|link=]]</span> |
| Line 146: | Line 158: | ||
| − | [[Image:Task-10.png|border|Executing Tasks through the operating system command window]] | + | <span title="Executing Tasks through the operating system command window">[[Image:Task-10.png|border|Executing Tasks through the operating system command window|link=]]</span> |
| Line 154: | Line 166: | ||
| − | [[Image:Task_Properties.png|border|Task Properties]] | + | <span title="Task Properties">[[Image:Task_Properties.png|border|Task Properties|link=]]</span> |
| Line 165: | Line 177: | ||
| − | [[Image:Sort_Tasks.png|border|Sorting Tasks]] | + | <span title="Sorting Tasks">[[Image:Sort_Tasks.png|border|Sorting Tasks|link=]]</span> |
| Line 173: | Line 185: | ||
| − | [[Image:Rename_Delete_Tasks.png|border|Additional Tasks functions]] | + | <span title="Additional Tasks functions">[[Image:Rename_Delete_Tasks.png|border|Additional Tasks functions|link=]]</span> |
| − | [[Image:Refresh_Tasks.png|border|Refreshing the 'Task Manager' list]] | + | <span title="Refreshing the 'Task Manager' list">[[Image:Refresh_Tasks.png|border|Refreshing the 'Task Manager' list|link=]]</span> |
| Line 195: | Line 207: | ||
| − | [[Image:TC-12.png|border|Parameters to Transform the Coordinates]] | + | <span title="Parameters to Transform the Coordinates">[[Image:TC-12.png|border|Parameters to Transform the Coordinates|link=]]</span> |
| + | |||
| + | |||
| + | <span title="CRS Catalog of the application">[[Image:TC-3.PNG|border|CRS Catalog of the application|link=]]</span> | ||
| + | |||
| + | |||
| + | *''Notes about transformation Grid files:'' | ||
| + | **''Some coordinate transformations (NTv2, etc.) require one or more Grid files in order to be processed. Some of the most commonly used Grid files worldwide are included in the application, but you can see that some others instruct you on where to download Grid file(s) not included with the application (usually a download URL)'' | ||
| + | **''On the other hand, even if the required Grid file(s) already exists (included as standard in the application, or previously downloaded by the user), the application allows the user to choose an alternative Grid file(s) so that he can use more accurate or updated Grid transformations when more appropriated files are available. This custom choice for a Grid file is kept by default for a work session, but will not be memorized when exiting and re-entering the application'' | ||
| + | |||
| + | <span title="Selecting alternative Grid files">[[image:SPMSelGridCRSFile.png|border|link=]]</span> | ||
| − | |||
| Line 207: | Line 228: | ||
| − | [[Image:Export to KML.png|border|Export to Google Earth (KML/KMZ) button]] | + | <span title="Export to Google Earth (KML/KMZ) button">[[Image:Export to KML.png|border|Export to Google Earth (KML/KMZ) button|link=]]</span> |
| Line 213: | Line 234: | ||
| − | [[Image:Export to KML 2.png|border|Open file in Google Earth (if installed) or open file location]] | + | <span title="Open file in Google Earth (if installed) or open file location">[[Image:Export to KML 2.png|border|Open file in Google Earth (if installed) or open file location|link=]]</span> |
| − | [[Image:Export to KML 42.png|border|The file in Google Earth]] | + | <span title="The file in Google Earth">[[Image:Export to KML 42.png|border|The file in Google Earth|link=]]</span> |
| Line 222: | Line 243: | ||
| − | [[Image:Export to KML 3.png|border|Export a selection of features to Google Earth (KML/KMZ) button]] | + | <span title="Export a selection of features to Google Earth (KML/KMZ) button">[[Image:Export to KML 3.png|border|Export a selection of features to Google Earth (KML/KMZ) button|link=]]</span> |
| Line 228: | Line 249: | ||
| − | [[Image:Export to KML 5.png|border|Assign a CRS to the Map button]] | + | <span title="Assign a CRS to the Map button">[[Image:Export to KML 5.png|border|Assign a CRS to the Map button|link=]]</span> |
| Line 237: | Line 258: | ||
==Related links== | ==Related links== | ||
*[[Spatial Manager Desktop™ - FAQs: Providers|See "Providers" also]] | *[[Spatial Manager Desktop™ - FAQs: Providers|See "Providers" also]] | ||
| − | *[ | + | *Blog posts |
| − | *[ | + | **[https://www.spatialmanager.com/converting-shp-to-kml/ Converting SHP to KML] |
| − | *[ | + | **[https://www.spatialmanager.com/geo-reference-unreferenced-spatial-data-table/ How to geo-reference an 'unreferenced' spatial Table?] |
| − | *[ | + | **[https://www.spatialmanager.com/import-directly-postgis-databases/ Import directly to PostGIS databases] ("Standard" and "Professional" editions only) |
| − | *[ | + | **[https://www.spatialmanager.com/convert-openstreetmap-files-shapefiles/ Convert OpenStreetMap data to Shapefiles (SHP)] |
| − | *[ | + | **[https://www.spatialmanager.com/extend-data-imported-ascii-file/ Extend the data to be imported from an ASCII file] |
| − | *[ | + | **[https://www.spatialmanager.com/point-coordinates-also-as-data-fields-2/ Point coordinates also as data fields] |
| − | *[ | + | **[https://www.spatialmanager.com/publishing-your-drawing-or-map-in-google-earth-one-click/ Publishing your drawing or map in Google Earth (one click)] |
| − | *[ | + | **[https://www.spatialmanager.com/little-known-options-when-importing-from-openstreetmap/ Little-known options when importing from OpenStreetMap] |
| − | *[ | + | **[https://www.spatialmanager.com/enhanced_ascii_data_provider_v4/ Enhanced ASCII data provider (CSV, TXT, ASC, XYZ, …)] |
| − | *[ | + | **[https://www.spatialmanager.com/coordinate-systems-and-transformations-detailed-info/ Coordinate Systems and Transformations detailed info] |
| − | *[ | + | **[https://www.spatialmanager.com/two-ways-to-bring-your-drawings-or-maps-to-google-earth/ Two ways to bring your maps to Google Earth] |
| − | *[ | + | **[https://www.spatialmanager.com/roads-and-streets-profiles-from-your-dwgs-or-maps/ Road and street profiles from your maps] |
| + | **[https://www.spatialmanager.com/shapefiles-shp-multi-class-export/ Shapefiles (SHP) Multi-class export] | ||
| + | **[https://www.spatialmanager.com/ascii-data-provider-tabular-format/ ASCII data provider Tabular format] | ||
| Line 256: | Line 279: | ||
| − | [[image:SPM Desktop Wiki to Website.png|150px|link= | + | [[image:SPM Desktop Wiki to Website.png|150px|link=https://www.spatialmanager.com/spm-desktop/ |Spatial Manager Desktop™ product page]] [[image:SPM Desktop Wiki to Download.png|150px|link=https://www.spatialmanager.com/download/spatial-manager-desktop/ |Download Spatial Manager Desktop™]] |
Revision as of 01:35, 25 August 2021
![]()
![]()
Notes:
- Some components in the images on this page (providers, names, windows look, etc.) may be slightly different from those that will appear on your computer
- Some application functions need to access the Internet from the application itself. If you experiment problems in any process, ask your network administrator if there is a Proxy server installed on your network. You can configure the Proxy settings through the application options
Introduction
- Objective of this section
- To learn how to define import and export processes and their parameters, manage coordinate transformations and create and manage tasks ("Professional" edition only)
- Topics in this section
- Sources and targets: Layers, features Selection and data sources
- Data Providers parameters: connection and set up
- Transforming the coordinates: source and target, favorite coordinate systems, searching in the coordinate systems table and transformation parameters
- One-click export to Google Earth ("Standard" and "Professional" editions only)
- Creating and executing tasks ("Professional" edition only): using the task manager panel, creating new tasks and executing saved tasks
- Task management ("Professional" edition only): task tree organization, task properties, execution of tasks on the operating system Command window and batch processes
How can I export Features?
There are several ways to export Features and their associated data in Spatial Manager Desktop™
- Export a whole Table: by right-clicking on the Table itself in the "Data sources" panel (drive/folder, Shortcut or UDS - "Standard" and "Professional" editions only)
- Export a Layer in a Map: by selecting the Layer and using the function "Export features" in the "Layers" ribbon
- Export a Selection of Features in a Map: by selecting the Features in the Map and using the function "Export" in the "Selection\Tools" ribbon
")
")
")

Note: Be aware that, in order to avoid forgetting features, if polygonal features are exported to a polyline-type target, the polygon contours will be exported as polylines
In all cases the "Export" wizard will be launched to guide you through the steps necessary to export a set of Features:
- Set up the Parameters of the source connection (if any), which will depend on the data Provider of the source connection
- Choose the target for the exporting process (this step will also define the target data Provider). You have to choose:
- A folder, or a Shortcut to a folder. In this case, you must also choose the type of target file by expanding the dropdown list of valid extensions to Export
- A container for Tables (usually a Schema)
- A file to replace (directly or through a UDS - "Standard" and "Professional" editions only)
- A Table to replace (inside a container of Tables; usually a Schema)
- Set up the Parameters of the target connection (if any), which will depend on the data Provider of the target connection
- Choose the Options offered by the target connection data Provider, such as Overwrite the target or Transform the coordinates
- Choose if you want to Run now and/or to Save a Task (except when exporting a Layer or when exporting a Features Selection) ("Professional" edition only)
The wizard lets you go backwards or forwards to modify the entries at every step
Note 1: Upon completion of any export process to a file you can directly open the file location. Furthermore, if you are exporting to a KML or KMZ file and Google Earth is installed in your computer you can open it using a button in the Export report window
Note 2 ("Standard" and "Professional" editions only): if the source or the target connection comes from a UDS, some Parameters may be "caught" from the UDS itself (depends on the data Provider of the UDS) and you will not need to reenter them


")


Note: Although the "Data sources" panel (see Data sources) is the primary tool to manage resources and accesses, create/edit Shortcuts and User Data Sources (UDS), and other related functions, the context menus (righ-click) in this Export window, will also allow you to execute many of these functions "on the fly", without having to return to the "Data sources" panel

How can I Import Features?
You can Import Features in Spatial Manager Desktop™ by right-clicking on a container (usually a Schema) of Tables in the "Data sources" panel. The Import process is similar to any Export process but, in this case, the target for the process is known and you have to first choose the source data to import

Note: Although the "Data sources" panel (see Data sources) is the primary tool to manage resources and accesses, create/edit Shortcuts and User Data Sources (UDS), and other related functions, the context menus (righ-click) in this Import window, will also allow you to execute many of these functions "on the fly", without having to return to the "Data sources" panel

What are the Tasks? ("Professional" edition only)
The Tasks in Spatial Manager Desktop™ are the way you can save any import/export process and its parameters, that have been designed to let you run, whenever you want, repetitive processes for import or export data tables. You can execute any Task directly from the application or from the operating system command window. You can access Tasks through the "Task manager" panel
The processes of extraction of the tables from the servers must be executed on a regular basis and sometimes these processes require the introduction of several more or less complex parameters, such as the destination file type, its location and its own parameters, perform a coordinate transformation between the origin and target, etc. Spatial Manager Desktop™ brings to you the concept of “Task”, that allows you to store all needed operations and parameters for any import or export process of spatial information. Once all necessary operations and parameters are saved as a Task, you can then run it from the Task Manager whenever you need. In addition, the application also allows you to run these Tasks from the operating system Command window and use wildcard characters for the name of the Tasks to be executed. This feature will allow you to program simple but powerful batch processes for the execution of multiple Tasks

How can I create a new Task? ("Professional" edition only)
You can create new Tasks in Spatial Manager Desktop™ using the "New task" button, in the "Task manager" panel, to start the "Create task" wizard, but you can also create new Tasks when you are defining any import/export process (except when exporting a Layer or when exporting a Features Selection) because you will then run the same application wizard

When you create a new Task, you will need to enter all the parameters to access origin and target data tables, the coordinate system transformation parameters (optional), the name of the Task and a description of the Task (optional). All this data is saved, into the "Task manager", as a new Task, until you want to delete it. Note that if you want to use a read-only UDS, you will be able to read data through this UDS (valid as origin) but not to write data (not valid as target)


How can I execute one or more Tasks? ("Professional" edition only)
You have two ways of executing Tasks in Spatial Manager Desktop™
The first way, directly in the application. You can select one or more Tasks in the "Task manager" using the CTRL and/or SHIFT keys. To execute the selected Tasks, use the right-click menu over any of the Task names and click on "Execute" or use the "Execute" button
All the executed Tasks will run one by one importing or exporting tables according to the parameters in the Task definition

When executing the Task(s) you will see the window showing all the actions performed by the Task(s) and, if you want to, you can cancel any process before the end. If you execute only one Task, you will previously see the Summary window of the Task


The second way, through the operating system command window. You have to open a command window in the folder where the program is installed, execute the command "SpmCmd", its parameter "/TaskName:", and the name of the Task to execute, where you can use wildcards such as "*" to execute several Tasks from one only command. Every time a Task has been executed, you will get a resume line showing the number of Features exported, if the Task performing was successful, or any error message that could be produced in the process

Can I see the Properties of a Task? ("Professional" edition only)
Yes, you can see the Properties of the selected Task in the "Properties" panel in Spatial Manager Desktop™

Can I sort the Tasks in the "Task manager" panel? ("Professional" edition only)
You cannot change the relative positions of the Tasks in the "Task manager" panel, but you can sort the Tasks in Spatial Manager Desktop™ by selecting the "Sort" button in this panel as follows:
- Group by source: you will see the Tasks grouped by their source data source
- Group by target: you will see the Tasks grouped by their target data source
- Plain list: you will see a list of all Tasks sorted by date of creation

Are there any other functions for the Tasks? ("Professional" edition only)
Yes, you can Delete and Rename the Tasks in Spatial Manager Desktop™ using the right-click menu over the Task item (only one), in the "Task manager" panel. You can also "Refresh" the Task list, using the "Refresh" button in the "Task manager" panel, if you make changes to your data sources in the current work session


How can I define a Transformation of coordinates?
When you are Importing/Exporting Features or creating a Task in Spatial Manager Desktop™, you will see that you can choose a Transformation of coordinates from the source to the target, in the corresponding wizard. That means that the application will calculate a geometric transformation between the source and the target data, which will depend on the chosen CRS for the source and for the target data. You can choose the appropriate CRSs by clicking on "CRS catalog...", in the CRS dropdown list for the source or for the target data. In the CRS table you can:
- Filter the CRSs by type (Geocentric, Projected, etc.)
- Choose a CRS by clicking on its row in the table
- Search CRSs by typing the search criteria on the "Search" box. You can type here as many words as you like separated by blanks. The application will find all the rows including all these words in any column of the table
After choosing a pair of valid CRS for a Transformation, you must choose the geographic Area to apply it to (the application will choose by default the most common Area for this Transformation)
- Notes:
- As you will see, the CRS dropdown list will include more and more CRSs as they have been previously chosen in others Transformation operations, so that you can choose your "favorite" CRSs directly from the dropdown list without having to access the CRS Table all the time
- If the application "knows", "guess" or "can assume" the CRS of the source and/or the target data, they will be chosen by default. You will be able to modify this choice except in cases where only one CRS is valid; for example, for a KML or a KMZ file the only valid choice is the CRS WGS84 (SRID 4326), because these types of file are always defined using this CRS
- If you have chosen the same CRS for the source and the target data, the application does not perform any geometric transformation of the Features, and warns you about it, but the resulting target data includes this CRS as the geo-referencing information of the Table
- Coordinate Systems and Transformation details
- Coordinate Systems objects available in the current version


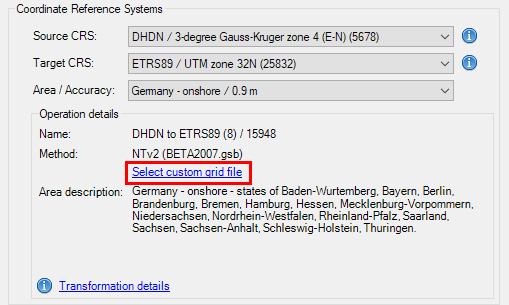
- Notes about transformation Grid files:
- Some coordinate transformations (NTv2, etc.) require one or more Grid files in order to be processed. Some of the most commonly used Grid files worldwide are included in the application, but you can see that some others instruct you on where to download Grid file(s) not included with the application (usually a download URL)
- On the other hand, even if the required Grid file(s) already exists (included as standard in the application, or previously downloaded by the user), the application allows the user to choose an alternative Grid file(s) so that he can use more accurate or updated Grid transformations when more appropriated files are available. This custom choice for a Grid file is kept by default for a work session, but will not be memorized when exiting and re-entering the application
Can I quickly Export the current Map status (Publish) to Google Earth ("Standard" and "Professional" editions only)
Yes, you can. Regardless of the advanced Export capabilities of Spatial Manager Desktop™, the application includes a specific function designed to Export the features in the active Layers of the Map and their data as well as the current Layers organization and properties to a KML or KMZ file (Google Earth) through a one-click operation
- The Layers in the KML/KMZ file will assume the colors, line weights, etc. of the Layers in the Map. A subdivision based on the type(s) of the features in the Layers will also be created for each Layer, allowing you a high level of visibility control in Google Earth
- The values for the NAME and DESCRIPTION of the elements in the KML/KMZ file will be automatically taken from the fields "Name" and "Description" if those exist
 button")
The Exported (KML/KMZ) file can now be opened in Google Earth. As an extra, if Google Earth is installed on the computer where the Export process was performed you can even open it using a button in the Export report window. Nevertheless, upon completion of the Export process you can open the file location directly
 or open file location")

You can also export a selection of features and their current Layers properties
 button")
The application needs to know the Coordinate System (CRS) of the Layers for Exporting, as in most cases this will be necessary to perform an automatic coordinate transformation to the CRS used in Google Earth. You will see a Warning window if the process cannot be carried out and you may need to assign a CRS to the Map

You can read about CRSs, the CRS Catalog and the Transformation of coordinates in the previous article and here: How can I choose the Coordinate System for a Map or a Layer?
Related links
- See "Providers" also
- Blog posts
- Converting SHP to KML
- How to geo-reference an 'unreferenced' spatial Table?
- Import directly to PostGIS databases ("Standard" and "Professional" editions only)
- Convert OpenStreetMap data to Shapefiles (SHP)
- Extend the data to be imported from an ASCII file
- Point coordinates also as data fields
- Publishing your drawing or map in Google Earth (one click)
- Little-known options when importing from OpenStreetMap
- Enhanced ASCII data provider (CSV, TXT, ASC, XYZ, …)
- Coordinate Systems and Transformations detailed info
- Two ways to bring your maps to Google Earth
- Road and street profiles from your maps
- Shapefiles (SHP) Multi-class export
- ASCII data provider Tabular format
![]()
![]()